🔧 BUILD Queen: 4T80e Turbo 2001 Park Avenue

General Information

So this car has a ridiculous amount of work already put into it. Overtime I'll try to highlight some of the big points with the transmission swap and some of the other really cool details, but for now I'm going to briefly explain what the car looks like when I bought it and what's going on right now with the build.

20211016_093706~2.jpg


I bought the car earlier this summer in very poor condition. All the high $$$ parts were already on the car, I've put less than $500 into it as of now. Bought the car for a great price, even if I had known everything wrong with it I still would have paid that much in a heartbeat.

20211009_170348.jpg


The 4T80e conversion was incomplete (car wouldn't shift into 3rd gear), everything was leaking except the rear suspension air bags, lots of misfires, horrible squealing from the engine due to improper belt routing, and other things I'm probably not thinking of.

Here's what the car came with:
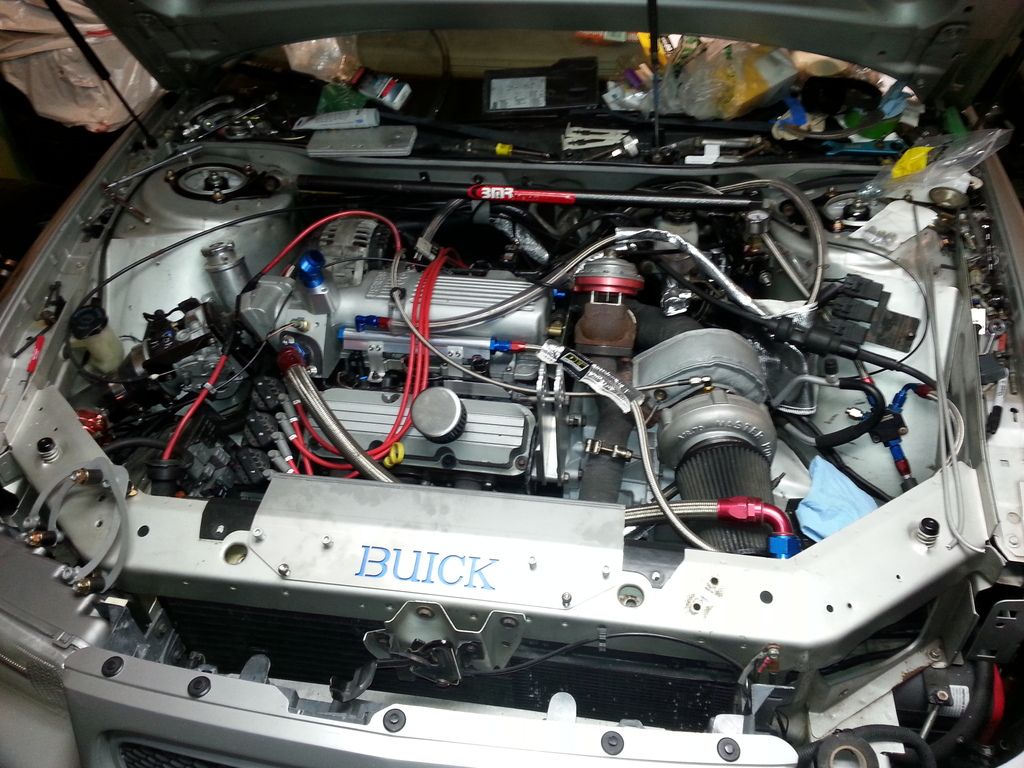
Engine:
-VS Cam with new GM timing chain
-Cobb Racing one-off turbo kit
-Camaro intake for beautiful routing of the charge pipe through the air/air intercooler
-(Unsure of what turbo is on it)
-No coolant overflow
-Stock Camaro TB and MAF (MAF was getting maxed out with the springs that came in the wastegate and blowoff)
-LS3 MAF installed but not wired up or tuned

Transmission:
-Stock rebuild 4T80e from a 2000
-3.11 gears
-700+ ft-lb rated LSD
-GM axles
-Cheap transmission cooler mounted in front of the driver's side wheel (effectiveness unknown)

Suspension:
-Stock parts, maybe some stock spec aftermarket stuff
-Broken away bar links in front (makes for an extra "exciting" ride when attempting to tame 400+ HP)
-Worn out 225 mm tires

Exterior:
-Rust
-Body panels in two different shades of green
-Rust
-Front end body panels are not from an Ultra (the car is an Ultra)
-Rust

Interior:
-Bone stock with a boost gauge and wideband.
-Lots of broken interior panels
-Heat and heated seats work :)

Fast forward to a week ago...

My friend Daniel has had possession of the car ever since we got it. He's been dailying while stress testing and taking care of little details, repairs, tuning tweaks, and some diagnostics. It's a win win for us because he doesn't need to spend money for his own car, he really enjoys the project, and I didn't have storage space or time for another project lol...

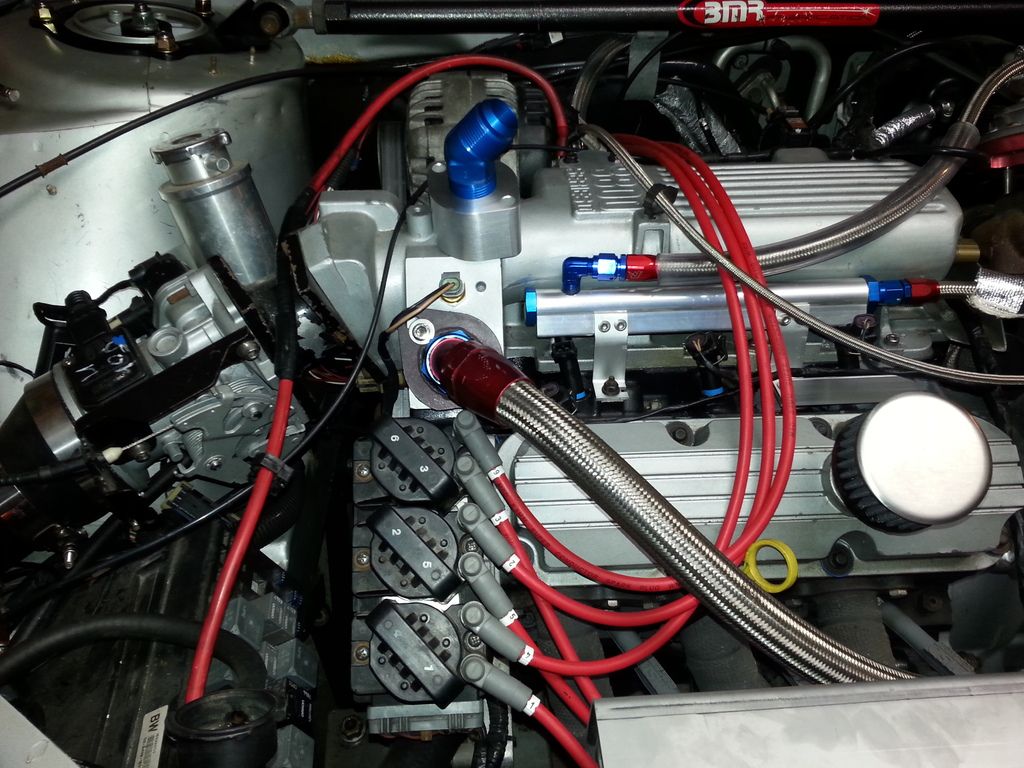
Anyways, even though we knew the mass airflow sensor was getting maxed out, we didn't really worry about it because we weren't getting any knock. During an extended 20 plus PSI pull he blew out one of the head gaskets. I'm sure the AFR was quite lean and I'm thankful we didn't lose a piston. We will be keeping a close eye on the afrs until we rework the mass air flow sensor system.

IMG_20211231_171257131_HDR.jpg

20211230_215206.jpg


Before we can rework the mass air flow sensor, we need to finish getting the car running good. The afrs are all over the place at idle because the oxygen sensor hasn't really been working and the used one I had laying around that we tried to put in when doing the head gaskets also isn't working. While doing the head gaskets we found that the spark plug gaps were very inconsistent from 24 thou all the way up to close to 40. After finishing the head gaskets and regapping the plugs, the misfires are gone at idle and full throttle.

Screenshot_20220104-152551-944.png


Next steps will be to convert the ignition system to LS coils and try another oxygen sensor. As soon as the AFRs are good and the misfires are completely gone at the same time, we will be putting a mini AFC on the stock Camaro mass air flow sensor currently being used.

turtleman

Addict
Sep 6, 2009
832
827
Villa Park, IL
Real Name
covid
Should be 28 spline so around 1 1/16ish i'd say at the thinnest where the splines are rolled
It might be too small but i was thinking of getting one of those axles and cutting it and splining the end for my cv axle but it looks like the largest diameter on the 80e output shaft is the bearing supported area close to the outside. That kinda looks bigger than the fbody axle
 

turtleman

Addict
Sep 6, 2009
832
827
Villa Park, IL
Real Name
covid
The remade LSD is done.

I ground the sides that face anything moving and dimensioned it tighter to try to prevent any clunking when the diff changes direction.
You can see how the blocks are held in place by the pin and the spider gears.
IMG_20240214_100050.jpg


After that I milled the spring pockets which is standard enough although I went to a precise depth that provides as much spring pressure as possible without bind, pretty much like it was set up but without the washers to shim out the springs tighter. I guess that might have been to have the option t have less preload or maybe they just f'd up and made the pockets too deep.
I did check the pressures on the springs and it is 1000+lbs between the four of them.

Then heat treated them aiming for 45Rc .
IMG_20240213_185206.jpg

psychedelic bro!

IMG_20240213_212722.jpg

Then I wire edm'd the bit for the spider gear pin. They originally milled that with I assume a normal 3/4 inch ball endmill and that works if done to the right depth but not totally ideal for nice even contact when the pin is .764"

IMG_20240214_095106.jpg

And that's that. It's duplicated.
Oh yeah, I just omitted the holes for the side retaining pins because it's not necessary at all for this diff - actually kinda makes it harder.

And I have a NIB standard one for sale at a discount that I'll just need to buy another set of the springs for.
 

turtleman

Addict
Sep 6, 2009
832
827
Villa Park, IL
Real Name
covid
Now that I'm done with the remade lsd insert, I'm getting started on the rest of the trans stuff. I could just pretty much toss this 45k mi 4t80e in and go but i might as well risk f'n it up and mod the valvebodies. I'm gonna pretty much just do the stuff mentioned in the 4t80e guide and one or two other tidbits. I need to get parts ordered but in the meantime, i'm taking it apart.

IMG_20240217_131859.jpg

my network of drain pans

IMG_20240217_134017.jpg

I knew as soon as I thought "this is going really well - i haven't spilled anything" I just enticed the universe, but it didn't go in! Subsequently I bought a lotto ticket.

I needed the cover layout for the future torsen lsd project so here's a peek into how that goes.

Step 1 establish measurement datum edges and set up reliable fixturing to work from.
With the cover off, the machined bottom is good.
IMG_20240217_152329.jpg

clamping a carpenters straightedge to an arbitrary distance is not ideal but good enough for what i need. Most important is that's just square to the bottom and won't move during the measurements
IMG_20240220_121731.jpg


Step 2 is to take measurements with calipers, micrometers, depth mics, and a tool or two I don't know the name of with precision blocks or whatever as needed and write em down as is (no math)
Also for this, I turned down the heads of ordinary cap screws for a touch point since the outside surface is usually not smooth or perfectly concentric to the thread.
IMG_20240220_121738.jpg


Step 3 would be to enter all measurements, doing the math to go from edges to centers and adding/subtracting riser blocks as you go, to autocad.
The green stuff is related to measurement features, not part of the trans. Some non-essential elements are embellished just to help with orientation
dwg.png


Step 4 print out a life-scale template to cut out and check stuff with and make sure I didn't booboo something up
IMG_20240221_114129.jpg


And now we're ready to make a diff cover holding plate to precisely machine my cover on a mill to accept a billet extension.
 

turtleman

Addict
Sep 6, 2009
832
827
Villa Park, IL
Real Name
covid
v6buicks v6buicks reinvigorated my motivation to put in the nuke fuel rails - not necessary but I want to use em. Support 3800 vendors and suchity-such.
So off to spend more money polishing a turd we go
James loaned me his loose intake setup and I was able to take a closer look at some things and made me realize the plumbing is gonna be different than I originally thought.


IMG_20240223_133226.jpg

I knew the front end of the front rail wasn't gonna have enough room for even a banjo fitting to go there because it's too close to the water outlet.

IMG_20240223_133639.jpg

front end of the rear rail

IMG_20240223_133715.jpg

What I didn't know is that the rear rail also has a problem in the area behind the alternator, even with just having the plug on it. I probably need to at least modify the plastic alternator rear cover to even get the rail installed at all.
So that means I can't connect to one side of either rail which means I'm stuck using both of the underside rail fittings which I'm not thrilled about but I am happy they at least have that option.

IMG_20240223_134401.jpg

So this is the arrangement I'm thinking. Reg is on the passenger side to fit NHRA rules. Hopefully the Y-block being where it is won't be an issue but I think that would be really nitpicking. I mean look at the rest of the car... I think it'd be fine.
 

Turbocharged400sbc

3800 & 4T80E > ALL
TCG Premium
Jun 16, 2007
32,649
16,127
hangover park IL
Npt on curved top
meh, its slowly getting there... fuel rails anodized and sealed up with viton O rings for ethanol, remade the buick Tq link plate for more harness clearance and to drop some weight. made an extra just in case i fuck this one up.
strut bar and mounts are in, alignment is set at full positive camber at the camber bolts so that i can do final adjustment at the CC plates.
20151126_190523_zpscsaaka6a.jpg


so then i moved onto the T stat housing and its conflict with the triple stack ICM/coil setup. i have to shorten the -16 hose but it'll fit now!
20151126_190626_zpswpesajie.jpg
 

Turbocharged400sbc

3800 & 4T80E > ALL
TCG Premium
Jun 16, 2007
32,649
16,127
hangover park IL
It is really odd and that's why at a DNA level, I have to love em
Let's not love em too much, they also used the 4t65e pos


would do if i made the rails like fatman bois. I doubt they have more than a minimal extrusion thickness to play with and that's the way it should be - mr. lotus

Yeah where dem aluminium heads at mr lotus quoter
 

turtleman

Addict
Sep 6, 2009
832
827
Villa Park, IL
Real Name
covid
IMG_20240302_175120.jpg

gettin the dual fuel system sorted out. 93oct rails and methanol rails...
not really but could do if we also did up a way better intake and spent real money on a turbo one day for a kill-ass drag car deal.

I'm just trying to tickle my nipple playing with the fuel system and take that momentum into working on the trans which is way less fun and way more frightening to me.

but on that note i committed to a fuel reg location (oh and a fuel reg) deatschwerks for the win if you're doin -6
IMG_20240228_123424.jpg


made a billet bracket for a buick park avenue baby baby
IMG_20240228_194455.jpg


dialed ;)
IMG_20240229_123510.jpg


that's the Y that i'd have to be concerned about for rules
IMG_20240229_123751.jpg


Anyway the fuel rail is, indeed, close to the alternator but they are just close and touchy, not a problem
IMG_20240302_174716.jpg


This is the more worrying part. We're very close to the charge term but it'll be ok... yeah it'll be ok. aluminum oxide doesn't conduct electricity thank god. but uh when it wears through the 20 microns of anodizing? no! shut up - it won't do that
I'll stick a rubber pad there
IMG_20240302_175458.jpg
 

turtleman

Addict
Sep 6, 2009
832
827
Villa Park, IL
Real Name
covid
Could've machined away more aluminium , i am disappoint. -mr lotus
those are the fuel cooling fins - functional
Also I realized there are some differences between your fbody upper intake and mine. Was yours like a 99+ version?
I want to fly cut it down to the parting line and then we could start tracing out the profile to add a couple inches of height, yea?
 

turtleman

Addict
Sep 6, 2009
832
827
Villa Park, IL
Real Name
covid
IMG_20240323_145015.jpg

I seriously think it might be time to cut my losses, roll this car off a cliff, and take up a new hobby and choose happiness.
I just don't have it in me anymore for this level of fail.
There was no perceivable reason for this to happen. Car was running fantastic, mild boost, just having a good time and then cylinder 4 just starts misfiring because the spark plug shorted... The only other time I've done this, there was a very clear reason. Long ago I was doing a max effort m90/nitrous pass in the old riv and I had a bad number in my trans tune and it never upshifted so it was just like pegged at 7k rpm for a second with spray and everything - chipped a piston in my L26. A lot of temperature, and a tuning error - that's on me. I'm cool with that but this is some bullshit! This car is cursed.
2024-03-23-15-48-08.jpg


I was in the middle of getting a fresh spunky transmission going, getting the radiator leak fixed, doin up the nifty new fuel rail setup, and a couple others odds and ends that was already plenty to be on my plate for a car that I was originally planning on being pretty much done working on by now, and then drive it across the country to visit my sister in FL. I just don't know what to do now - I'm drained
 

v6buicks

TCG Elite Member
TCG Premium
Oct 22, 2018
6,376
15,836
Franklin, IN
Real Name
Jon
Damn man. I've been there. Some cars just seem to want to suck rather than live up to time and money we spend on them, but one thing is for sure. If I was in your shoes I'd regret giving up.

The only cars I really regret letting go are the ones I put my heart and soul into and let their shitty demeanor prompt a for sale sign.

That one has L67 pistons right? Has it been sitting a lot? Could it have been bad gas? Was it set up for E85?
 

Thread Info