🔧 BUILD Reviving The Cherry Popper - 1980 Scout

Jon01

TCG Elite Member
TCG Premium
Feb 8, 2012
4,103
15,959
Got stuck at work late so the groundhog gets to live another day, but tomorrow he meets his maker.

Did come home and do some Scout work before dinner - got the threads chased for the head studs and valley cover.

PXL_20220330_233959634.jpg


Also got the assembly lube and head studs in the mail today.

PXL_20220330_234300965.jpg


PXL_20220330_234706454.jpg


Head studs have gone up about 50% in the last couple years...thanks Brandon.
 

Jon01

TCG Elite Member
TCG Premium
Feb 8, 2012
4,103
15,959
Need to do an update here.

Over the weekend I got the dash harness just about wrapped up. I need the ECU mount to arrive to get that installed then I'll finish the routing and mount the dash for hopefully the last time.

Today I came across a 30k mile 6L80E with a Circle D 3,000 converter in it so I snagged it quick. I'll have to have the 4wd output shaft stuck in it and I'll probably have new clutches and the updated pump assembly put on while it's apart.

PXL_20220405_222808775.MP.jpeg


PXL_20220405_222731948.jpeg


The main bearings and rings showed up today so I came home and got after that.
I was able to get the valve springs changed out:

PXL_20220406_011908972.jpeg


Then went out and got the crank laid in with plastigage so I can start checking clearances once my new angle torque wrench arrives Thursday.

PXL_20220406_014300786.jpeg


Also the seats and bases arrived. I left them all in the box for safe keeping but they're heated sport seats in tan vinyl. I'm going to have the stock rear seat recovered to match them, my hope is that the tan ties in with the green plaid on the door panels and headliner.

IMG_20220405_210338.jpeg
 

Jon01

TCG Elite Member
TCG Premium
Feb 8, 2012
4,103
15,959
Main bearing clearance checked, they came in between .0015 - .002 and thrust is .002.
Cleaned things up, added ASS LUBE, put the caps back in, torqued and done.
Rods I got about half clearance checked before wifey came home and wants to do something. All around .002 - .0025. A little loose but whatever, it's Plastigage so I'm taking it for what it is.
I'll check the rest tomorrow, stick the cam/lifters in it and install the rings on the pistons.

PXL_20220408_154509374_exported_1131_1649460830705.jpg


Had a Gomer moment and thought my 4" bore ring compressor would work on this thing...except it's a 6.2.
Dumbass.
Amazon will have a 4.065 here Sunday and I can slam the rest of the pistons in and put the heads on. Then it'll be a pretty much complete long block.

I decided I'm going to replace all of the accessories, so next thing is to order them, the output shaft and other refresh items for the trans.
 

Jon01

TCG Elite Member
TCG Premium
Feb 8, 2012
4,103
15,959
Went back and re-read OffshoreDrilling OffshoreDrilling thread about his 6L80e rebuild and ordered parts to get this thing in good shape for many years:

1649508549586.png


1649508477729.png


This will let me get that low mileage 2wd unit updated and into tip top shape.
Once this shit shows I'll take it to the trans guy.
Hopefully by the end of April I'll have the powertrain ready to install.
Then I order the last of the suspension parts, send steering box out for rebuild and we're ready to start jamming parts into place.
The end is getting to be in sight.
 

Jon01

TCG Elite Member
TCG Premium
Feb 8, 2012
4,103
15,959
Shortblock done, lifters and new guides are in, decks I cleaned back up and set the heads/gaskets on with hardware finger tight.
Only drama was an oil ring that was being a bitch going through the compressor on #7. Whatever it went in after adjusting things around no problem.

PXL_20220412_020636286.jpeg


PXL_20220412_023724387.jpeg


I used this spring compressor and it's a bad MF. Highly recommended.

ARP 900-0650 4.065 ring compressor https://www.amazon.com/dp/B078WKNRG3/?tag=tcg21-20

Tomorrow I'll torque heads, hang the pushrods and rockers then maybe look at the front dress.
I need to order the new accessories so they're here before I hang the brackets but we're gonna have to pay our taxes so I think I'll give the money tree a bit of a breather and digest that.

It's coming together.
 

Jon01

TCG Elite Member
TCG Premium
Feb 8, 2012
4,103
15,959
I still can’t comprehend all the shit you juggle at the same time. Making some good headway on this thing
One of the joys of having ADHD. I'm at my best when I have 12 irons in the fire.


It looks like the extra wire I ordered from AAW will arrive today so once I get done torquing the heads this evening I plan to get the last couple aux power wires run. Once that's done Ill mount the ecu then the dash can go in for the last time.
 
  • Like
Reactions: OffshoreDrilling

Jon01

TCG Elite Member
TCG Premium
Feb 8, 2012
4,103
15,959
I've seriously been slacking on this thing the couple of months - been busy getting things at the farm in shape, traveling to get wife's car and getting the fleet serviced for summer trips.
The friends we are going to Montana with in August were giving me shit for lack of movement last weekend when we grabbed dinner with them so I decided to get off my ass and get to work on this thing today.
Got lots of shit done:

About 95% done with the motor - new valve covers and she'll be ready to rock.

PXL_20220531_004539464.jpg


Got the Circle D converter stuck in the fresh trans:
PXL_20220531_004511360.jpg


Drilled hole in firewall for engine harness and routed harness through it:

PXL_20220531_004742599.jpg


Got the aftermarket a/c system hung and wired in loosely:

PXL_20220531_004501548.jpg

Mounted the ECU and strung the harness to it as well as the interface harness with the cab - MIL, 12v switched, ALDL connector, etc...

PXL_20220531_004647477.jpg


Next I need to finish off the dash harness, pull the grill/hood and get to work on the front lamp harness. Once that's done I'm about out of excuses to not take it out to my buddy's shop and start the drivetrain swap.
 

Jon01

TCG Elite Member
TCG Premium
Feb 8, 2012
4,103
15,959
Went to hook the Jeep Dana 300 to the back of the AA adapter/6L80E before I went on vacation only to find the output shaft was about 1/4" too long and bottoming in the case.
AA says in their instructions that the 2wd output may need trimmed and that the G8 style output won't work but they make no mention of the 4wd unit needing attention.
Whatever, is what it is.
I thought about it and decided rather than trimming down the shaft I'd just add a clocking ring to get the depth necessary So, ordered that while on vacation along with a bunch of other shit.
Wifey and I got up early this AM and went to work, got the adapter sealed to the trans, clocking ring sealed to the case and assembled the major components together.
At first I thought I fucked up and ordered the wrong clocking ring - I got one to raise the case as I don't want it hanging way down waiting to get bashed.
With the Anything Scout mount kit I'm running elevating the clock position of the front driveshaft and shifters would run them right into the hump in their crossmember.
IMG-9806_1296x.JPG


But, the D300 is a durable unit, has a deep 4-low ratio and should be a bolt in affair for speedo output, shifters, etc...so I am highly inclined to keep it.
After some more measuring it looks like the AS kit centers the trans in the body so I decided to just flip the crossmember and put the hump on the drivers side.
That'll put the exhaust away from the front driveshaft, transfer case shifter, fuel lines, wiring to the rear of the truck, etc...all good things.

PXL_20220612_143256340.jpg


PXL_20220612_143229710.jpg


So, that's done I think.
Now just waiting for FedEx to bring the new timing cover I ordered and I can slap the front of the engine together, then install new oil pan and accessory drive.
Once that's done the drivetrain is complete.
 

Jon01

TCG Elite Member
TCG Premium
Feb 8, 2012
4,103
15,959
Timing cover showed as did the valve covers I ordered to run for now.
Got them installed, oil pan and the water pump.

PXL_20220620_001431244.MP.jpg


After some more looking at the accessory drive bracket I think I'm gonna have it blasted and either paint or coat it and I'm gonna buy a new dampener. I've come this far why cheap out the last 1/2 lap.

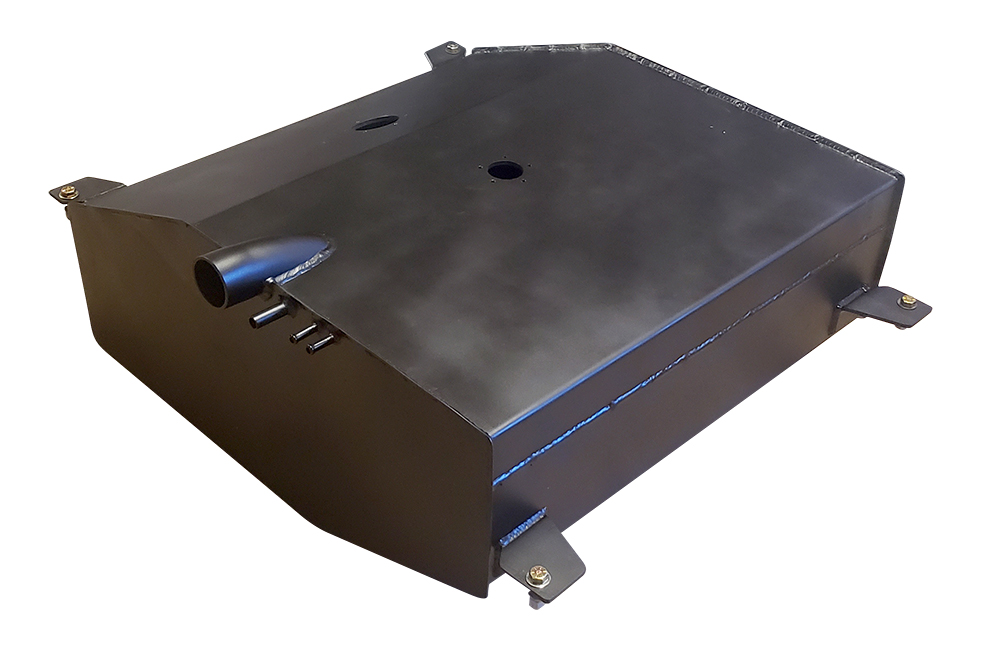
Also got real rowdy with the c/c, ordered a new gas tank with in tank pump and an additional 6 gallons of capacity.

I never imagined I'd spend $1500 on a fucking gas tank but do it once and be done.
With the wheeling we may do, a converted, unbaffled stock tank may lead to starvation issues and the added capacity will be handy no doubt.

Also ordered a drop in aluminum rad with 4x9" electric fans so there's no way this thing should run hot.
 

Jon01

TCG Elite Member
TCG Premium
Feb 8, 2012
4,103
15,959
  • Like
Reactions: Mr_Roboto

quikturbo

Regular
Dec 24, 2004
398
695
Great progress! I'm using the Advance adapter to mate the 4l60e to a D300 (jeep) and had to shorten the shaft, but I'm using a ScoutCo trans mount. The Anything scout mount was on indefinite BO when I was at that point last year :) it looks like a really nice product.

keep up the great work and updates!
 
  • Love
Reactions: Jon01

Jon01

TCG Elite Member
TCG Premium
Feb 8, 2012
4,103
15,959
Great progress! I'm using the Advance adapter to mate the 4l60e to a D300 (jeep) and had to shorten the shaft, but I'm using a ScoutCo trans mount. The Anything scout mount was on indefinite BO when I was at that point last year :) it looks like a really nice product.

keep up the great work and updates!
Thanks dude!

Yeah, I would have had to have shortened the shaft too were it not for the clocking ring.


Your input is what led me to just spend the $$ on the radiator and I think I will be glad that I did.

How is yours coming along?
 
  • Like
Reactions: quikturbo

quikturbo

Regular
Dec 24, 2004
398
695
Oh, I also forgot to give you props on the new CPT fuel tank, after having to deal with an external pump and having 2 bad "Bosch" pumps so far I'm a bit frustrated. There are lots of issues with them being fake but I bought through a reputable distributor, verified as best I could and still went bad. All that said, I may bite the bullet and do that same setup with the intank so I'll look forward to your feedback!

Mine or I should say my wifes because she's been driving it a ton is about 90% and we're loving it. Still have a few things to do but all pretty minor and it's still driveable while doing them.

64F7FE8E-F47E-4FAC-8A56-73E53A3D1A36.jpeg
1D1A21B9-81F6-4D34-B4D5-79398838CDB0.jpeg
 

Jon01

TCG Elite Member
TCG Premium
Feb 8, 2012
4,103
15,959
Yeah, I've done external pumps in stock tanks on other shit and it's always a pain in the ass. They're just not meant to pull fuel.

Were I not in a rush I'd have done the Binder Boneyard setup with the aluminum tank. It's a little bit cheaper and holds 33 gallons.

Yours looks great! Nice work there!

Where'd you get the covers for your corbeaus? I want to put the stock fabric on mine eventually.
 

Jon01

TCG Elite Member
TCG Premium
Feb 8, 2012
4,103
15,959
Successful day in the garage.
Got the new pulley put on the new ps pump.

PXL_20220627_001655474.jpg

Engine harness fusebox is mounted.

PXL_20220627_001903192.jpg


Engine harness is fully integrated into the dash harness - power, grounds, CEL, brake lights, ALDL mounting location.
Dash harness is done aside from final routing around the frame, mounting the switches/gauges to the frame and plugging them in. I would have gotten it completely done but the dash pad has to go in before the frame so the defrost vents can mount to it.
AC evaporator is mounted and secure.

PXL_20220627_002048426.jpg

PXL_20220627_001727160.jpg


Wifey put another coat of paint on the engine, it looks very nice.
Also changed out the shit chinese valve covers that didn't fit for shit for some Holley's that fit really nicely.

PXL_20220627_001825968.jpg


Dropped the accessory drive bracket off at the powder coater yesterday, hope to have it back in a week or so.
The fuel tank should be here Tuesday judging by the tracking #.

I am going to run to the farm tomorrow or Tuesday after work and get the dash pad, install it then I can mount the defrost vents, then dash frame, then gauges and install the radio.
Once that's done I think it's time to take it out to my buddy's shop and do the suspension and LS swap.
We may see mountains in this thing this year yet...
 

Jon01

TCG Elite Member
TCG Premium
Feb 8, 2012
4,103
15,959
Dash installed, switches installed, gauges installed, remounted the HVAC shit and got the radio ready to install.

PXL_20220628_013057017.MP.jpg


PXL_20220628_013105984.jpg


About outta shit to do before it goes to my buddy's shop to start jamming big parts in it.
I think I'm gonna bring grandpa's pickup along with my LBZ and trailer up from the farm this weekend and haul shit out there.
 

Jon01

TCG Elite Member
TCG Premium
Feb 8, 2012
4,103
15,959
Big few days of Scouting to document here kids.

I took it out to my buddies place to get after the big shit.

PXL_20220704_210623262.jpg


First we pulled the stock axles and jammed the new ones under it. I didn't take any pics of that...sorry long days...

I took the stock polycast wheels and cleaned them up and repainted them.

PXL_20220705_211800800.jpg


Then I had the tires mounted and of course had to get the obligatory photos.

PXL_20220706_223103758.jpg


Then we got after the radiator, hood, grille and header panel.

PXL_20220706_223130712.jpg


Next we chopped off the stock shock towers.

PXL_20220707_011137466.MP.jpg


I need to call IHPA and figure out which shocks are front and rear, and also how to mount these long travel front shock towers.

Tonight we got after the stock motor and trans are pulled. I'm gonna clean them up and send them on their way.

PXL_20220707_024922976.jpg

PXL_20220707_025240597.jpg

PXL_20220707_031950885.MP.jpg


Tomorrow I'm going to put it back on the trailer and take it to the car wash to power wash the shit out of things.
Then I'll cut the stock motor mounts off to prep for the swap mounts but I think I'll wait for my good buddy that's a weld engineer to come weld those in place Saturday.
If time allows I'd like to get the fuel lines run and the filter mounted.
Once that's done I can stab the tank in place and connect that up.
Mountains in 6 weeks. Fingers crossed kids!
 

Thread Info