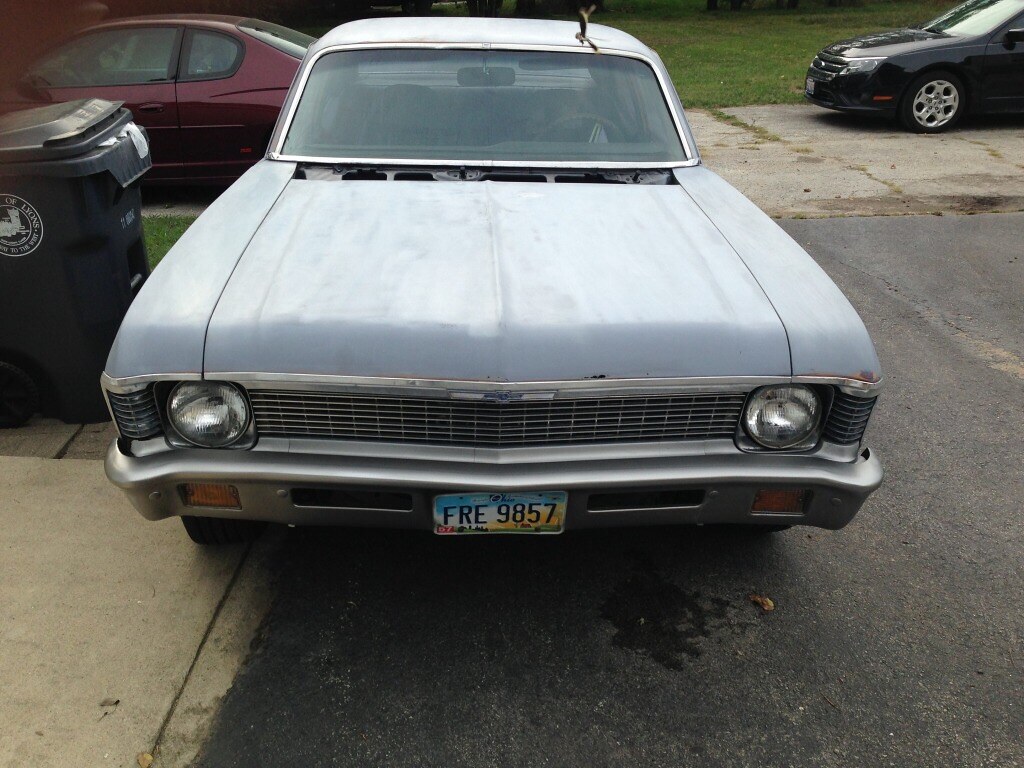
🔧 BUILD 1971 Nova - Work in Progress

General Information

1971 Nova - Insanity in Progress

I bought this Nova last year when I sold my mustang, I was a active member here when this was CSVT so all the info of my old car is still on this site. Some of you know me from other sites as well as some of the old CSVT members who are still around. I apologize in advance for being a little long winded.

I was looking to get back into a classic muscle car that I could restore and modify to my liking. I choose a Nova since they are cheap and my wife wanted it to be a chevy. I enjoy all makes/models domestic or import which is why I enjoy TCG.

Specs:
1971 2 Door Nova factory v8 auto

Engine
350 block 383 stroker
Cam - unknown (I have several cam cards from the previous owners not sure which one is installed)
Rods/pistons - unknown
Heads - stock
Edelbrock intake - unknown which model
Holley 750 double pumper

Trans
700R4
3200 Stall
Shift Kit - Jegs brand

Rearend
10 bolt 8.5
3:56 gears

I knew the car needed some work before I bought it....I just underestimated how bad some of it was going to be. When I got the car the owner I purchased it from had just primer bombed the car and splatter painted the trunk (was still fresh when I went to look at the car). I would have still bought the car but would have negotiated a better price, but hey live and learn. The guy I bought the car from purchased the car from an elderly couple in Ohio who had a binder of documentation which was a huge selling point to me. Unfortunately I didn't look closely to see that the receipts didn't have much specific information. So the documentation only shows dates and what parts were replaced not what they were replaced with (for the most part anyways.) Again no biggie.

The car had 3 paint jobs in it's life plus the primer the guy I bought the car from put on it. Under the primer was a Suzuki gold that was applied in 2002. (what a FUGLY ass color) under the gold was a red. Whenever the red was put on the car it also had extensive body filler applied but no rust or sheet metal repair, more on that later. Under the red was a factory correct blue. The cowl tag says the car should be Sandalwood, while I did find it on a few parts of the car this leads me to believe someone painted the car early on in it's life or worse someone swapped the vin and cowl tag to another car :dunno: . Also there were a few spots where Green was found, I'm assuming a donor car or junk yard parts replacement. To be honest with all the documentation I have it just confuses things even further. The car was also in a few fender benders, the worst being the passenger front fender.

In 2001 the whole suspension was replaced with stock equipment minus air shocks, this was also when the whole drive line was overhauled and the engine was turned into a 383 stroker. I'm just guessing and based on some info I've accumulated from Steves Nova Site SNS, everyone seems to agree this theoretical combo should be around 350-400hp 400+tq.

I drove the car for a few weeks and fixed some legal and safety equipment such as putting on the rear bumper, side mirrors and attaching the seat belts. The car actually drives pretty good, has some good low end torque and the trans shifts firm. These were all the reasons I purchased the car as I didn't want to blow the budget replacing the mechanical's right away while I concentrated on restoring the body and getting it in paint. I was originally hoping to have it in paint in early spring of this year. Currently it may see paint by spring summer of 2015. (crosses fingers)

Goals:
For now I want a nice cruiser that's got some decent hp/tq. I'd like to drive it around town and take it to a few cruises/car shows. During winter I always like to tinker and do upgrades.

My unrealistic dream goal would be to turn it into a pro-touring car. Sitting low on 18x10 or larger wheels. I would also drop in a LS series engine maybe a LQ4 on a tight budget or go wild with a LS3/6 variation. The car will stay an auto, I know some people won't understand that but I love a good auto as much as banging gears in a stick car.

Short term goals that are more realistic is to just restore the vehicle to good quality, I will keep the drivetrain as it is for now as it's in good shape and if anything blows up take it to the next level at that time (budget pending of course). The body will be fully repaired and painted by myself. It will be painted a blue (unsure of which specific color code at this time) but it will be a medium to dark hue.

Bottom line is all work will be done by me, in my garage with whatever tools I currently have or acquire. Hence the whole reason for purchasing this car.

Now to what's happened since I started work along with pics.

As I purchased it, as you can see the body doesn't look bad at all. Looking at it very throughly I could tell there was bondo/mud applied and I did notice some rust in the rear quarters and in the trunk area (which is common for these cars) I also noticed the body bushings were bad again another common problem with age.
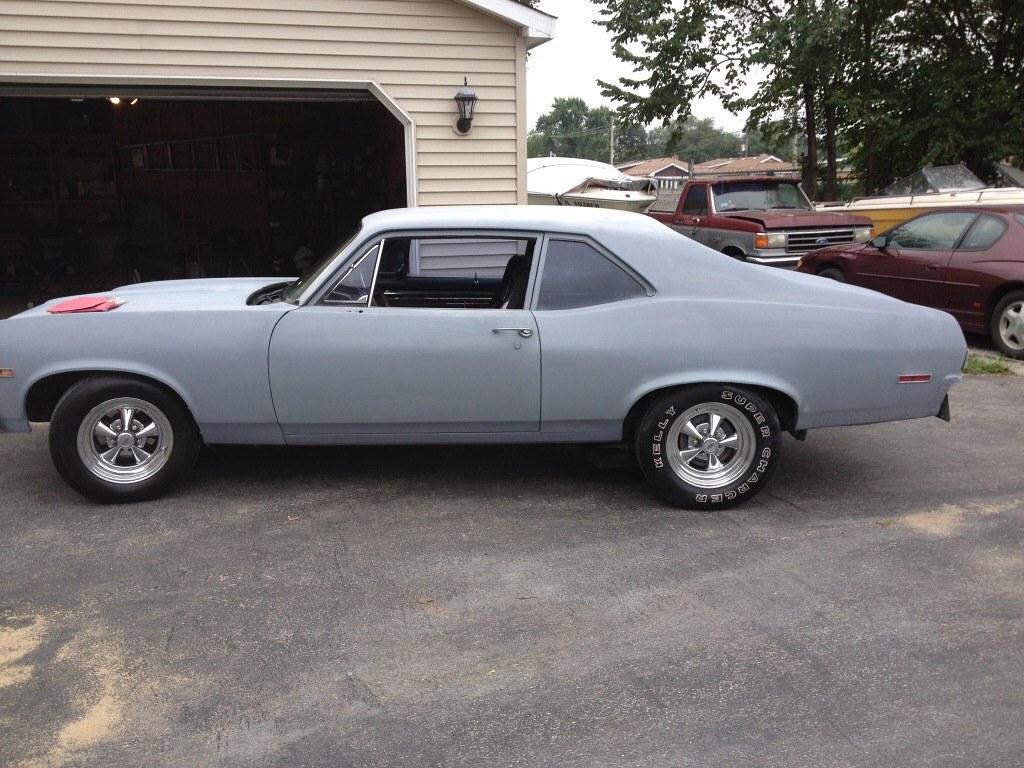


IMG_1489 by Chris Watkins, on Flickr

IMG_1490 by Chris Watkins, on Flickr


Engine Bay, looks can be decieving, the whole front accessory system is a redneck engineer mess along with the fan and rad shroud.
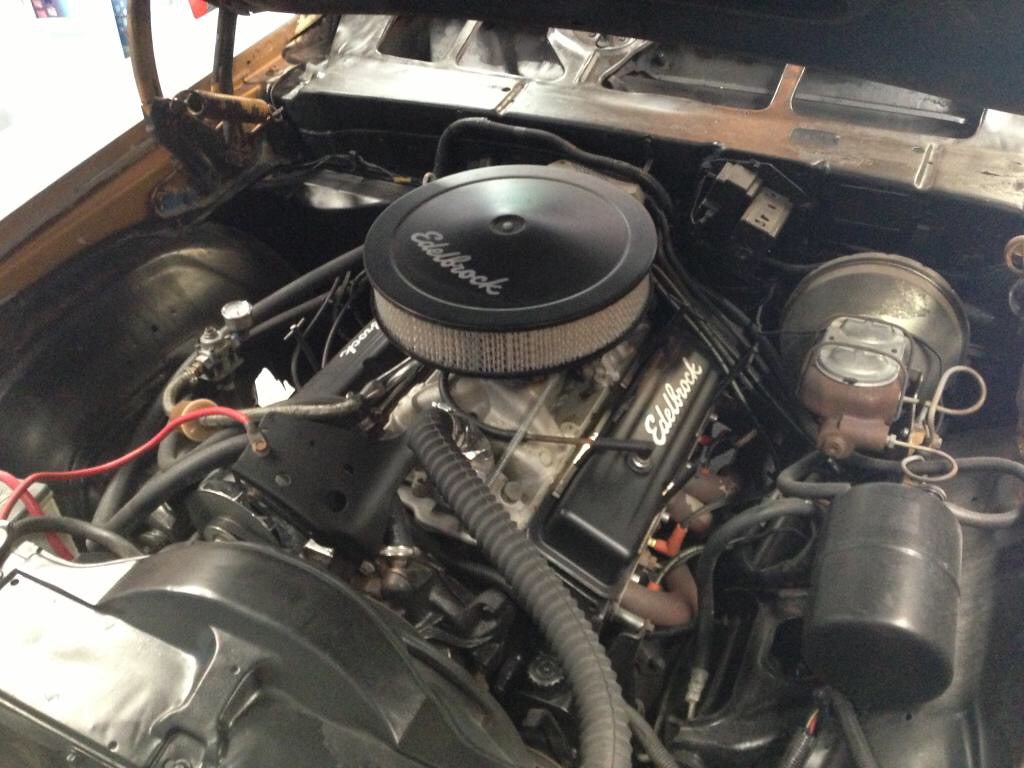
IMG_1487 by Chris Watkins, on Flickr

IMG_1503 by Chris Watkins, on Flickr


IMG_1504 by Chris Watkins, on Flickr

Pics of the interior, the seats are trashed and the carpet doesn't fit right as it's either a universal or not the correct for this make/model/year.
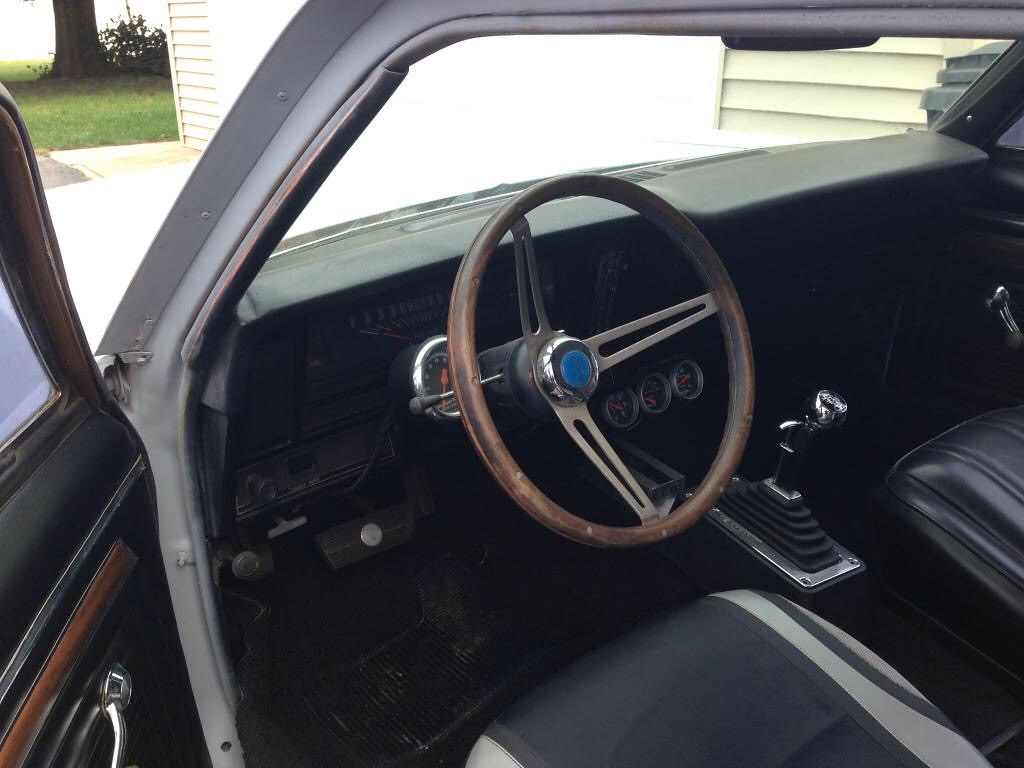
IMG_1499 by Chris Watkins, on Flickr


I'll break this up into a few posts.
  • Like
Reactions: Spivitz and HeavyG

cap42

Restoration Hell
Mar 22, 2005
2,783
2,491
Bolingbrook IL
The Nova floor might be easier than Camaros. I've only done the Camaro ones whole floor. With the big ass seat mount junk it sucks. The whole floor if needed can be a way better fix. It just takes so much fitment. The subframe can get way wonky if not fit right.

ya, that's the biggest con of doing the whole floor. This car wasn't put together with a whole lot of quality from the factory. Trying to get it all square and level is going to be a pain. I'm sure the camaro floor is very similar to the nova floor in regards to being a pita.

The big advantage to the whole floor would be quicker than welding in the individual pans and look nicer overall. The whole pan route would be rosette/plug welded to the rockers and only seam welded on the front toe boards/rear seat pan. Doing individual pans means 3 sides are seam welded and only 1 side rosette/plug welded. More welding = more grinding and of course more chances for fuckups.

Going to ponder that for a few weeks before I pull the trigger, I have plenty of other work to get too first and with the holidays I won't be getting a whole lot of time on the car.
 

cap42

Restoration Hell
Mar 22, 2005
2,783
2,491
Bolingbrook IL
Need to keep motivation to work on this turd...

Said yolo and welded in the driver side firewall panel. Took all day of prepping, welding and sanding down the weld prouds and didn’t finish all the welds before calling it quits.

Pics.

Primer on both inner sides, getting it clamped/cleco’d in place.

IMG_0003.jpg


Welds, you may notice I added more spot welds then there were screws previously.
IMG_0004.jpg

Moar welds, all done

IMG_0005.jpg

What was sanded down

IMG_0006.jpg

some more dressing of welds and this is done for now.
 

cap42

Restoration Hell
Mar 22, 2005
2,783
2,491
Bolingbrook IL
Felt like cleaning the garage.

Threw the subframe on got it half ass aligned (very hard to do solo). Then threw the fenders on and pushed it out into the driveway and blew off inches of dust and dirt. I will have to look through this thread to figure out how long it has been since this pile of shit has seen daylight.

I used an old boat crank attached to a chain to get it back in the garage. The crank is attached to the workbench. My driveway has a decent slope and the asphalt is for shit by the apron so it’s a bitch trying to push it in the garage solo.

IMG_0014.jpg

IMG_0015.jpg

IMG_0016.jpg


I then threw on the fenders to make room in the garage while I cleaned it up. Then started on floor pan, I still had the rear driver pan so I figured why not.

IMG_0017.jpg

Rear subframe suspension mounting point.

IMG_0018.jpg

Close up

IMG_0019.jpg

I bought a slip roller last month, I will use that to make the patch for the trans tunnel that’s cracked. So that decides which path I will be doing with the floor pan issues.
 

cap42

Restoration Hell
Mar 22, 2005
2,783
2,491
Bolingbrook IL
Yes this pos is still rotting in my garage, usual excuses why I haven’t worked on it lately.

A few weeks back I did put in an hour or two but got fed up real quick. I found the leaf spring pocket rotted out in a small section. I used a rust converter on it.

After sandblasting it clean

521deb25b27faef0bdc4eb7c3fb71935.jpg


After rust converter, you can see the hole where I put a screwdriver through it on the right side.

a647c9c556121a4c19528e050cbc6437.jpg


Today I was just futzing with cleaning up the garage and fitting the rear seat pan. It’s all done, just need to sand everything, clean and prime it before welding it in.

3ca1f45c4879a4b99773b7017484540a.jpg


Going to hold off for right now as I still ponder if I do anything with that leaf spring pocket. I could probably leave it primed and undercoat it later and it wouldn’t harm anything. It’s just one of those things that I will know I didn’t fix.
 

cap42

Restoration Hell
Mar 22, 2005
2,783
2,491
Bolingbrook IL
As long as it's solid I'd put in the floorpan and weld the hole up from the bottom and fill it in. Otherwise keep up the good work!

Most of the mount is solid, just that area that's attached to the rocker is crunchy, probably a inch and half front to back and about a half inch wide is rotted. After sleeping on it I will cut that out with a small patch and weld it in. Trying to weld up that hole will just be a big booger.
 

cap42

Restoration Hell
Mar 22, 2005
2,783
2,491
Bolingbrook IL
Cutting out of the rust is almost done and I am excited!

I haven’t finished welding in the rear floor pan, I need a second set of hands to hammer dolly one section of the trans tunnel. So I started on the patch for the rear seat pan.

6669aa8cd4243e6f32bb28eae2b54044.jpg


Pretty quick process, make a template, transfer to steel, weld through primer and burn it in.
44911ff9d84a7aff97a58a03e3bc5577.jpg


5672281e45e6cebcbe70d753fbaa090e.jpg


I dressed the welds after this photo, not going to fully stitch weld it. Just going to seam seal it later and spray a chassis coating and top coat from the underside later.

Next was an area I have been dreading for a year or better. This may not look like much but it was a lot of fitment making the patch. Didn’t take the before picture as it is somewhere already in this thread. The rear window leaked and I was afraid I wouldn’t get this resealed when the window went back in. I am glad I did it as the metal was pretty thin.

All cut out, I sanded what I could clean after this pic, before I burn the patch in I will use a rust converter on what’s left.
f1c780e5bcbcd8954c11e4b511151c61.jpg


3674ffd96695419f135be22f5056a552.jpg


Here is the new patch, I may remake it as once I used the shrinker to get the contour of this curve it obviously shorted the overall length of the patch.
26ca454c90aec32e6c57ea37239618df.jpg


9410e903a74ff60846660a749c9a299b.jpg


6dbb75e27c33c1d4139027fca91b7ac9.jpg


It’s a damn near perfect fit, I don’t think I could remake this patch as well as I did the first time. It’s just a hair short on each end. I can make it up with weld or metal filler, just going to think about that till the next time I get in the garage.
 

cap42

Restoration Hell
Mar 22, 2005
2,783
2,491
Bolingbrook IL
Yes I am finally back at it, just in time to take more breaks for deer hunting, thanksgiving and some work trips.

I spent most of my time this weekend reorganizing the garage but did get some time in finish welding and grinding of the rear window channel. Since body filler can't be used there it was tedious time consuming work. I had to weld up all the small pin holes and carefully grind it all back smooth without destroying the multiple bends and curves. Still a little more to do. I didn't snap any pics but I will get them next time I am out.

I did an overall assessment of the car, there is a metric shit ton of metal finishing to do. However I am past the rust replacement phase. I just need to grind off any excess weld and correct any areas that need addressing. So In the upcoming months I will be putting the body of the car back together and attempting to get the metal as strait as possible. I will also be doing the custom mods I have touched on previously in this thread. One of the more exciting ones is hacking the bumpers up and getting them tucked nice and close to the body.
 

cap42

Restoration Hell
Mar 22, 2005
2,783
2,491
Bolingbrook IL
These updates are actually from 2 weeks ago, I had a house project pop up on me and then I was out of town for work.

First up the pics of the finished rear window channel. A few pinholes to weld up but otherwise done.

IMG_0338.JPG

Now this was done and technically rust repair is complete I have decided to move on to metalwork and prep for sealing this bad boy. Surface rust is coming back again and I need to get a coat of epoxy on it. As in years past the wife and I are talking about selling the house and moving and if that happens come spring I need the car as close to being in one piece as possible to move it easier. Lots of work in a small time frame.

In this stage I need to fix what metal I screwed up, needed to be fixed because it was manufactured half ass and fix anything that someone else did wrong over it's lifetime.

I started with the passenger door as it was driving me nuts being all out of wack. Needed to install the weather stripping so the door would close correctly and I could fix the door gap and window frame. This was all wasted time by the way, I ordered new door seals a year or so ago and didn't document how the old seals were removed. Needless to say I installed the seals backwards which is why the doors wouldn't close properly.

Seal on backwards, but it looks right doesn't it??

IMG_0339.JPG

How the door wouldn't close even pulling the striker and twisting the door.

IMG_0340.JPG

AFter I figured out I was being a dumbass.

IMG_0341.JPG

IMG_0342.JPG

I used straps and a block of wood to pull the window frame backwards, it was too close to the A pillar and had an excessively large gap on the B pillar. I was afraid I was going to have to drill the spot welds and move it. I'm statisfied with how it came out and now both doors look uniform (from the window area at least).
IMG_0343.JPG

The door has always been too far forward, it's off by a 1/2" from the driver side. I may have to cut the door hinge off and covert to a bolt on style hinge and space it back. Not sure yet, a bit of research to do and make my mind up later. With the door fitting as best as I can get it now which is pretty good aside from it being forward I decided to move on to the front.

I once again halfassed align the subframe, which is a total pain in the ass to do by yourself. I threw the fenders back on and started on getting the fenders aligned. I will bolt up every part of the car including the grill, hood and headlight assembly.

I ran into an issue with the driver fender. I originally thought I warped the fender when I was welding in new sheetmetal during rust replacement. As the body lines doesn't match up and doesn't follow the rest of the car. I went back through my photos and found this fender had a metric fuck ton of filler put on it since it was in a fender bender sometime in it's life. I fixed the sheet metal and pounded out the dents long ago but never tried to make the panel fit back on the car right.

Sometime in the past year I picked up a tool to measure contours, came in handy during this exercise. This is based off the passenger fender but the picture can speak for itself. This is just a pic of the fender on a sawhorse, it's upside down and you can see where I patched the sheet metal.

IMG_0344.JPG


This is middle of the fender no where near where I cut out and welded in new metal. The gap between the tool and the metal is the difference between the 2 fenders. It obviously get's worse as it get's closer to the edge.
IMG_0345.JPG

This doesn't look like much but it gives you an idea how twisted and mis shaped the fender is. Now I can cut the brace off the back, pound and hammer and shape this back into what it needs to. But I've learned that sometimes it's just easier to buy a replacement panel for how much work would be into this. I may go the replacement route but it will need work itself. At this point I called it a day and I will get back to this after the new year.

Come January it will be crunch time, getting the car back into one piece for mockup purposes as well as transport (hopefully). If I have time I will get back to some of the custom mods I have planned for the body. Otherwise when the weather get's to be 50-60 degrees I will be spraying expoxy on it to stop the rusting.
 

cap42

Restoration Hell
Mar 22, 2005
2,783
2,491
Bolingbrook IL
Been at it but haven't updated this thread lately. Rust replacement is done and I have officially moved onto metal work. What that really means is now going back and fixing all the shit I screwed up previously or didn't finish. Some of this will be prep for the bodywork phase.

Did this a few weeks ago and it took f00king forever, I started seam welding in the firewall where it met the cowl. So just the top seam is finished, I do need to add additional spot welds on the bottom. I am not sure if I will seem weld the bottom areas or just use seam sealer to keep the moisture out. This was extremely tedious work and took 2 days.

IMG_0377.JPG

IMG_0376.JPG

Next up I tackled the Driver front fender, I had been pondering ordering a replacement but figured I would give it a shot before scrapping it. Glad I did as it turned out pretty good, there is still some tweaking to do and I may end up buying a fender to save time later so who knows.

I don't have a before picture showing how bad this fender fit, normally I just threw the fender on and threw a few bolts in it to hold it on but never gapped or made sure it aligned in all areas. But you will see the area I marked up with a sharpie. That area the style line was off, I couldn't get the fender to meet the door opening or the rocker it was just in all sense and purposes completely out of wack! So I pulled the fender off an drilled the spot welds that held this section of the fender onto it's brace and using heat, some hammer/dolly persuasion got it to where it fits almost perfectly. I later welded the spot welds back together. Here's the pics I did take.

Spot welds, finding them and drilling them out (n)
IMG_0378.JPG

IMG_0384.JPG

IMG_0385.JPG


Now some heat, some persuasion and whola!

IMG_0386.JPG


I know it doesn't look like much, this was easily 5-6 hours of work and something I am proud to say I can do if I put my mind to it. I still need to fix the whole gap as it's not uniform from top to bottom but pretty close, remember quality was not part of the original manufacturing process

The biggest factor here is the car is being re-assembled so the passenger fender will get the same treatment, the hood will go on again, the grill and bumpers. Once the bumpers are on I will be tucking them close to the body and doing some modifications to the rear fenders for that tuck. I need to get the front together so I can visualize what modifications I am doing there. After those mods it will be bodywork time, slinging filler and many many hours of sanding. :poop:

IMG_0379.JPG


IMG_0380.JPG


IMG_0383.JPG


IMG_0387.JPG
 

cap42

Restoration Hell
Mar 22, 2005
2,783
2,491
Bolingbrook IL
At least I am working on this turd on a weekly basis again. I shouldn't jinx myself though (I know I just did)

Trying to keep the ADD (squirrel syndrome) down to a minimum and focus on getting the body back together . As with last week the focus is still on I was going through my parts tubs and found the gasket for the drivers door. Had to pull the old one off which was not fun as they must have put it on when the paint was wet and they also used silicone to keep it in place.

IMG_0401.JPG

IMG_0402.JPG

No pictures of after as it was boring, I just used a wire wheel to strip the old gasket and silicone off. Put the new one on and thank god it didn't change how the door fitment worked. I still need to tweak the drivers door as the door pin bushings are shot (have the replacements already) and the door is tweaked inwards at the top of the door and outwards at the bottom. I will replace the bushings soon and work on getting the door aligned top to bottom.

The passenger fender fit pretty good I don't have any pictures of that. The only downside is a bolt on the bottom of the panel broke, the threads are still inside. I will need to drill the bolt and tap this area. Again no pictures as this was boring. I didn't feel like dealing with that yesterday so I continued on.

Next up is getting the bumpers on and fitting them to the body and marking out my modifications. You can see why that's needed in the below picture.

IMG_0389.JPG

IMG_0390.JPG
IMG_0391.JPG
IMG_0392.JPG
IMG_0393.JPG
IMG_0394.JPG
IMG_0396.JPG

As you can see these bumpers tick out pretty far from the body of the car. The plan is to tuck these bumpers into the panels a bit and close the gap between the bumper and rear tail light panel of the car. The easy part is closing in the bumper from side to side. Based on the measurements I am going to slice two 1 inch sections out of the bumper which will bring the bumper sides into the body of the car.

The blue tape is 1 inch wide, you can see where I am planning on cutting the bumper. This is past where the bumper attaches to the rear of the car and in a area where there are not complex bends such as near the license plate.

IMG_0398.JPG

Same on the right side, shame to loose the old bumper sticker but these bumpers will be re-chromed or painted later so it has to go regardless.
IMG_0399.JPG


This is the picture of the planned modification to the panel. There are 2 lines. The one closest to the bumper is the contour of the where the bumper meets the body currently. The second line (outward) is where the bumper will actually be once it is brought closer to the tail light panel.

IMG_0404.JPG

Now the fun part which I haven't fully figured out yet. The bumper brackets which you can see from the original post of this thread are not a strait piece of metal that I can just cut off an inch and weld it back together. Plus the bumper mount connects to the side of the bumper to give strength from a side to side hit. The tentative plan is grind off the heads of all the button bolts that protrude from the outside of the bumper inwards. Weld them flush, then create a stud mount system that will be fixed to the bumper and the studs will bolt into the back of the car's rear rail. That is going to take a lot of measuring and planning.

Not going to cut anything up just yet, next week will be futzing with the front bumper, grill and other misc stuff to make this look like a car again. Need a 2nd set of hands to drop the hood on and then I can really align the whole front of the cars panels and gaps.

IMG_0395.JPG


IMG_0397.JPG


IMG_0400.JPG
 

cap42

Restoration Hell
Mar 22, 2005
2,783
2,491
Bolingbrook IL
Slice and Dice

IMG_0423.JPG

IMG_0424.JPG

Side view, this is with the body panel not yet cut just the bumper flush to the panel.
IMG_0425.JPG


Here I cut the panel to allow the bumper edge to be hidden in the panel. The plan was to recess the bumper into the panel slightly, not a full tuck. If you were standing near the front fenders and looked down the body of the car I wanted the rear bumper to be seen but only sticking out a half inch or so.
IMG_0426.JPG

Rear view, just tape and jacks holding it in place. Here you can start seeing where I want to place the bumper, this is much lower than the factory location.
IMG_0427.JPG
Top down view, the bumper is inside the quarter panel. However look more closely at the bumper and how it aligns with the styling of the quarter panel. I will touch on this later.
IMG_0428.JPG

Here is all 3 sections of the bumper held in place with tape to give you an idea of how it would look. The drivers side quarter isn't cut to recess the bumper.
IMG_0431.JPG

Here I mounted the left side to it's original factory location, you can see how far the bumper sticks out on the left but also how high the bumper sits, the next picture is a bit clearer. This makes it a pain to remove the tail lights with the bumper on.
IMG_0433.JPG

Here is the full shot to show you how far the bumper is raised compared to where I plan on putting it.
IMG_0434.JPG

Last pic and this is where I had to stop and rethink my plan.

IMG_0432 (2).JPG

If you look at the bumper it comes to a point near the corner as it bends around the quarter panel. From the factory it's supposed to mimic the style of the body. If I pull the bumper into the panel (side to side) then this style line that flows from the body through the bumper doesn't line up anymore. I don't know how big of a deal it is, I'm still thinking through this, but here are my options so far.

I can tuck the bumper in and hope that the style line doesn't stick out like a sore thumb but looking at this it bothers me.

Or I can move the bumper closer to where it was originally so it lines up more with the style line and then add metal to the side of the bumper. When you would look at the bumper from the quarter it would come close to the panel or actually recess into it.

If you care to look at the previous posts pictures you might get clearer on what I am talking about here. At any point I can go either way, there are extensive modifications regardless of which route I go. The bumper needs several corrections from dents and just poor manufacturing. The bumper mounts to the body need to be fabricated to account for the adjusted locations, both top to bottom and side to side regardless of which option I go with. The quarter panel needs patches made as I never liked seeing those stupid kickouts, there really is no reason for them to exist other than the designers were lazy. I will touch on that in a few weeks when I get to that fabrication.
 

cap42

Restoration Hell
Mar 22, 2005
2,783
2,491
Bolingbrook IL
With Covid-19 you would with think I would have more time to work on this turd but motivation has just not been at a all time high. I did put in some time yesterday, it was one of those days that just didn't seem to get a lot of progress even though a good amount of time was spent. Doesn't look like much and I will try to explain without going TLDR on you.


First up where I left off last time, this wasn't visable in the pics I had taken since the bumper was in place. This is where the rear support meets the interior drop off pan and the outer fender. It sticks out past the fender hence where there is a large bump out the bumper is supposed to cover.
IMG_0496.JPG

Side view which kind of shows you how far it sticks out past the quarterpanel.

IMG_0497.JPG

Didn't grab a pic but I lopped off the small section of sheet metal that stuck out past the quarter and then ground down the rear brace. The next pics are the standard make a template out of cardboard and then transfer to steel.

IMG_0498.JPG

IMG_0499.JPG

I left a little extra towards the rear of the vehicle thinking I could just fold the metal over and connect it to the rear brace. More on that at the end.

Took a few pics in progression. There are a lot of complex bends since this panel isn't strait. There is also a style line that tapers off in this area. I decided to carry the style line all the way through, however it tapers off and is not easily seen since the sharpie mark covers it.

IMG_0502.JPG

IMG_0503.JPG

IMG_0504.JPG

And the almost finished pic, this patch is completely done, took a lot of fussing to get the small tab to bend over and meet the taillight panel. Didn't grab of a pic of that yet but it will be seen in the next updates I do.

IMG_0505.JPG

It is ready to be burned in, as I indicated above I wanted to fold over the extra material to connect to the rear brace. I'm going to forgo that and make a another patch that just fills the area in from the rear and connects to this patch that will be visable. This way will be a little more work but will close up the trunk area and if the bumper isn't on the car it won't look like dogshit. During all this mockup and fabrication I was playing with the bumper and found that if I grind off some of the roughness and make a uniform edge that is seen from the side of the car I can get a clean uniform gap without having to add additional metal.

Thats it for now, not a whole lot of exitement just some complex fabrication that took all my special tools and quite frankly doesn't look at all exciting.
 

cap42

Restoration Hell
Mar 22, 2005
2,783
2,491
Bolingbrook IL
Covid-19 has at least one positive, I was able to work on the this turd both days this weekend and actually put some decent hours in. Instead of getting more done I focused more on quality and hopefully you all agree based on the end result pics. I didn't take pictures of the whole process as I was in the zone and really focused on doing this right without having to come back and fix it later because I was rushing.


Burned in the outer patch, you can see the weld marks from the inner patch.
IMG_0511.JPG

Not a good pic but the inner patch made (had to make the patch twice as I screwed up the first one).

IMG_0512.JPG

What I am really proud off is the finished results, this is after I cut off the excess and seam welded it.

IMG_0513.JPG

IMG_0514.JPG

Up to this point this is around 15 hours of work into all of this. The next few pics took only 5 mins, I just wanted to get started on the other side before cleaning up and calling it a day.


Before I hacked it all up. I cut on the original panel weld line when I put this quarter on. Didn't want two weld lines and have to deal with excessive shrinkage.
IMG_0515.JPG

What it looked like from the rear before cutting.
IMG_0516.JPG


Cut, what you don't see is the window cauk that someone slathered on where the quarter met the rear tail light and rear bumper brace. It still shocks me the shit I uncover on this car especially since I have been at it this long and still uncovering boneheaded shit.
IMG_0517.JPG

Last pic is what it looks like from the rear. Again you can see how far the rear brace section sticks out past the quarterpanel.

IMG_0518.JPG

The driver side should go much quicker now that I have the passenger side under my belt. I now know what needs to be done and how to best fabricate this. I know it doesn't look like much but I am very pleased with how it's coming. I don't have pics but I have been test fitting the bumper up to the panel. There will be many hours in getting the bumper to look as good as the work I just completed on the passenger side.
 

cap42

Restoration Hell
Mar 22, 2005
2,783
2,491
Bolingbrook IL
Slight change in plans, not a squirrel moment I swear! I started doing prep for making the panel and got underneath the car to clean up the spot welds that attach the quarter to the trunk drop off pan and noticed how crusty it looked. It was quite thin in some spots and I actually knocked some of my spot welds loose. The metal was just thin especially on the bottom where it met the new quarter I put on. You can see here it's not even attached anymore after those spot welds broke loose.

Here's a pic, yes I know the undercarriage is nasty looking. I still need to get this car up on some blocks and spend a few days with a wire wheel. I'll get that in a few weeks.

IMG_0528.JPG

So I paused for a bit and decided to mock up the rear bumper on the passenger side. I didn't take pics for every step and I have been contemplating doing small videos which would help explain things and hosting them on like instagram. I am just so anti social media I haven't been able to bring myself to do it. Anywho here are some of the pics, you can see the sharpie marks where I am marking the initial trims.

IMG_0523.JPG

IMG_0524.JPG

Got the outer lip cleaned up and did a smooth radius on these, there was obviously more metal taken out. I then realized I needed to have the passenger side and center section of the bumper together so I spot welded them together, took out more metal. I used some shims and tape to get the bumper at the height and location right and here is where it ended up.

IMG_0527.JPG

In the above picture, I am using the tape visable to keep the bumper so the bottom meets the bottom of the quarter. It always bothered me on the factory look that these huge ass bumpers hung down below the body of the car.

In the below pic you can see how close the gap is to the body of the car. I still need to take another 1/8 or more off the top section of the lip or else it won't fit when the car's painted but you can see what I am after here... nice tight gaps.

IMG_0526.JPG

This last pic is a bit tough to explain. If I took a quick video and explained it, I think it would come across clearer. These bumpers were pressed out of a single piece of steel. Obviously that's for mass production and not quality. When you bend metal especially across different contours the metal has to go someplace. This tape line shows that the bumper has a slight V Shape in it to mimic the slight V Shape in the back of the car. The topmost section of the bumper (Visible looking strait down standing at the trunk area) is not the same depth throughout the top most edge. So this tape line shows what I need to cut/grind off so the bumper follows the tail light panel of the car with the same uniform gap. I will get more pics of this later on when the whole bumper is tacked back together and back on the car.

IMG_0525.JPG

That's all for the pictures, I did start making the patch panel for the drivers side but I have to hold off until the drop off pan is in hand. If I closed out the quarter it would limit my access to weld it to the rear tail brace. I am not replacing the whole drop off pan just the bottom edge. I found one on Amazon for $40 and I am just crossing my fingers that it is a good enough panel to cut off the bottom 1/4 and splice it into the original drop off pan. Once that is done I will then weld in the new closeout patch. Then I can fit that section of the bumper to the panel. Weld in the bumper completely, fabricate new mounts and do what metal finishing is needed (fixing dents etc.)
 

Thread Info