🔧 BUILD Pontiac power (AKA the anti-van build) 1971 Lemans 4-door build

Mr_Roboto

Doing the jobs nobody wants to
TCG Premium
Feb 4, 2012
25,841
30,997
Nashotah, Wisconsin (AKA not Illinois)
After having the van be a jack stand ornament, I decided to double down. I have been looking for a while, and wanted something with the following criteria:

-SIMPLE. Nothing complicated to work on, old school no EFI or the likes.
-good aftermarket, less having to fab stuff if I don't want to. Better factory powertrain options at my disposal if I want them. Something I could "check book" parts for from a catalog.
-Simple to get back on the road, so minimal amount of work involved in getting on the road
-Muscle car style preferred, but would take something else if it was "right"

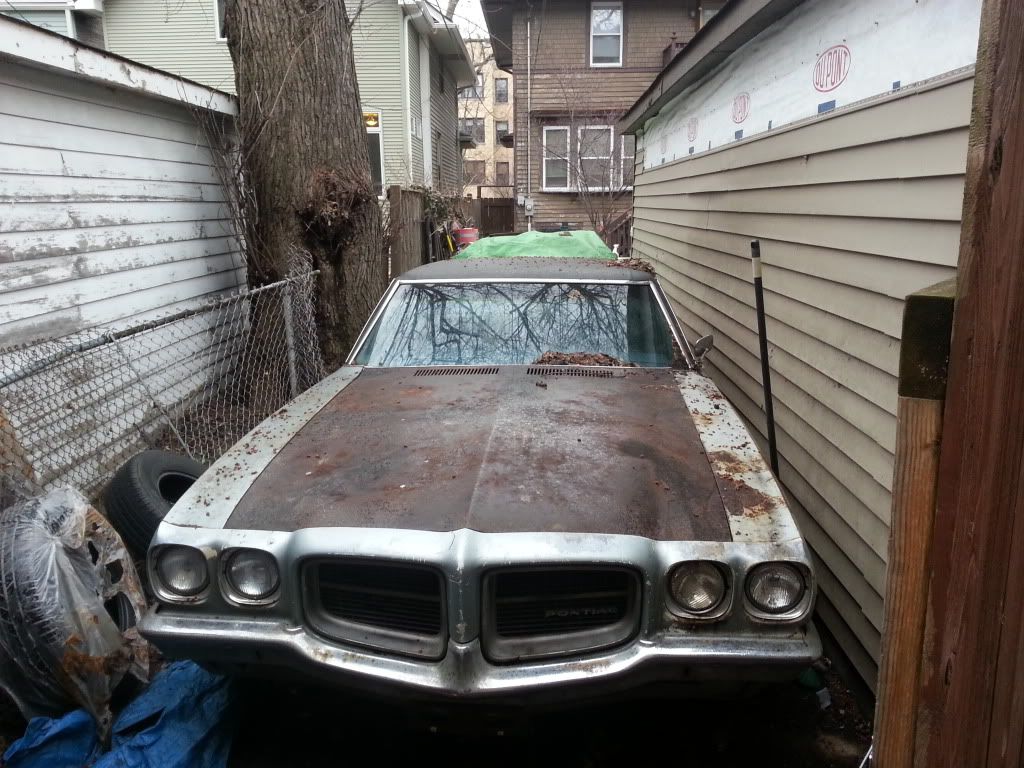
After doing some looking, I finally found this car. It's a 71 Lemans 4 door. I don't mind it being a 4 door, the big thing I didn't want was extra 4 door weight which is minimal with an A-body. I went and looked at it, for an A-body of the vintage the amount of rot is amazingly minimal. I have to do the very rear quarters, but the fenders seem solid which is astouding. It also needs rear body work as well. The hood is not original, as is obvious from the pic. I'm thinking do some black paint for the hood and the trunk lid but leave the rag top be. It seemed solid under the rag top, so I don't really have any intentions of pulling it right now. The engine's a Pontiac 350, and the trans is a 3 on a tree. It's sat for pretty much 20 years, this guy bought it last year out of someone's garage and decided not to work on it. Luckily for me he couldn't take pictures, otherwise it would have been gone. I will also say the interior is fucking IMMACULATE. There are no tears on the seats, and the dash has to be one of the mintiest ones I have ever seen in a car of this age. NO cracking. The only issue is the column needs some love. I paid up for it, have the title and am going to load her up this week.

Right now the to-do list is:
-Get some tires that don't say "sears roebuck" on them.
-Shifter bushings for 3 on a tree.
-obligatory fluid changes
-Check/fix brakes, which he said were mushy. Probably wheel cylinders/hoses. Looks cheap from Rock Auto
-Dizzy swap to HEI, full tune up otherwise.
-Carb rebuild if needed, hoping not. Just a 2 jet. If so may do below.
-4BBL intake and a Q-jet some point down the road. (anyone got a Poncho 350/400/455 intake for cheap?)
-patch rear right quarter and check for other rot.
-GTO hood is always tempting, but unlikely unless I get a killer deal.

The shifter bushings are the biggest thing I need right now. I think I can wing something from Home Depot or the likes though and have it work fine. Brakes are a pretty close second, after they come apart I'll be putting an order in to Rock Auto for parts. Also want to look at the fronts and figure out how to convert over to disks. I'm think HEI for the mpg, starting and driving. The over all plan is to keep this cheap, stock as possible and drive it till the wheels fall off.

 
  • Like
Reactions: v6buicks

Mr_Roboto

Doing the jobs nobody wants to
TCG Premium
Feb 4, 2012
25,841
30,997
Nashotah, Wisconsin (AKA not Illinois)
Be nice when I get her home. Sorta freaking about dragging a trailer through the streets of this neighborhood. more pics etc. Thursday when I go pick it up. Also finding a truck to use is sucking too. gonna just rent one.

Dug though my parts pile, as it turns out I have a Chevy Q-jet set up for a divorced choke. Need to figure out if/how hard that will be to set up on a Pontiac intake, and acquire said intake. I know the fuel line will have to be tweaked, but hoping that's all.
 

Mr_Roboto

Doing the jobs nobody wants to
TCG Premium
Feb 4, 2012
25,841
30,997
Nashotah, Wisconsin (AKA not Illinois)
First task is to figure the jammed column out. Second is to figure out why one half the mc is empty the other nearly so. Disconnected the shift rods and the column still did not go back and forth.

20130419_184718_5_zps5fa183e0.jpg
 

Mr_Roboto

Doing the jobs nobody wants to
TCG Premium
Feb 4, 2012
25,841
30,997
Nashotah, Wisconsin (AKA not Illinois)
Got the rear drums popped off, everything actually looked dry much to my amazement (no fluid in the rear of the MC.) Also started taking the bumper off, so I can start hammering things out.


This piece is probably the worse on the car overall. It was the trim piece below the bumper, and has rusted really heavily for some reason.


These are something like some 5mph bumpers on the back. They just bolted on, I don't think the earlier cars had them nor are there any spots on the bumper that will be noticeable if I leave them off. Probably first pieces that are gonna get scrapped from the car. They've definitely seem some use.


This is the body work I'm planning. First thing is that there is some significant bulging on the side, and that the gap at the trunk lid is about 1/2-3/4 inch too wide. I am working on pulling the bumper off, then start trying to get the back corner raised up the 1.5 inches or so I need to. The corner needs to come back about an inch as well. Any thoughts about executing these changes? I'm really wanting to try and avoid doing something (too) stupid and stretching the hell out of the metal. There was already some work done on this, I have a thin (although probably not ignorant) layer of bodo popping off the fender. Just wanting to get the trunk lid lined up properly, it seems to be sitting right even wit the bumper the way it is.
 

Mr_Roboto

Doing the jobs nobody wants to
TCG Premium
Feb 4, 2012
25,841
30,997
Nashotah, Wisconsin (AKA not Illinois)
Bought a ton of parts for the beast tonight, really basic stuff but I'd love to get the brakes going and get her running decent. I bought the first of two big tweaks I want to, the HEI stuff as well as a full tune up with platinum plugs (Normally I'd do copper like a mofo but they were on close out at Rock Auto cheaper than coppers.) Pics to come when parts show up.
 

Mr_Roboto

Doing the jobs nobody wants to
TCG Premium
Feb 4, 2012
25,841
30,997
Nashotah, Wisconsin (AKA not Illinois)
Pulled off the bumper, and started pushing out the rear quarter. LOTS of pics to come. There's rust below, but it's not rot just surface. It looks rough but seems a lot more cosmetic than anything. I have been using wood blocks and a bottle jack or two in order to do what I need to. We'll see how it's coming, but overall I'm pretty happy that I'm keeping the amount of stretch to a minimum for the amount of metal I've shifted around. May be inclined to get another trunk lid, I think this one is bowed and since it's the obvious datum for fixing the quarters it may be easier for me to get another trunk lid than attempt to make this one "right" without any obvious reference considering it also has a janky lock hole, a bunch of dents in the double wall area and lastly a bit of rot, perhaps the most I've seen on this car crazily enough.

Still need to figure out how to narrow the opening of the trunk. The gaps are all screwed up. Would love to hear a pro body guy chime in.

I have also yanked the wheel off the column and started looking at that. Going to have to take it loose in the car at the very least, probably pull it. Anyone know if the 3 on a tree shifter bowl is the same as an auto shfiter bowl? Not holding my breath, figure I may get lucky though.

I also think this thing has sat for a LOT longer than it was given credit for. I looked through the magazines in the trunk and they were Soccer mags from 1974. There was also a really moldy popular mechanics from 1975. I still have as of yet to even get into the glove box, so who knows what is in there. Still looking to get a door key made.

Lastly, anyone got an A-body in pieces in the area? Need to find one so I can examine how the quarters fit together up close as well as the trunk lid.
 

Mr_Roboto

Doing the jobs nobody wants to
TCG Premium
Feb 4, 2012
25,841
30,997
Nashotah, Wisconsin (AKA not Illinois)
OK pic time


This is the back after I yanked the bumper. She looks really rusty but it's all surface thankfully. There's scale on the frame but it's not rot. Need to find some wire wheeling, primer and paint. Places to go, people to kill though.


You can see the massive, nasty crease in this. I have pulled it back quite a bit in later shots. I have some metal tearing of all things, it's where the 90s were in the stamping so I am surprised but not at the same time. Just simple stress fracturing of metal that has probably been that way for decades.


"intermediate" shot. I've already done a bit of work on it,but there's still a ton more needing to be done.


Another one, you can see where the trunk lid doesn't line up. It needs to come out a little as well I think, it got pushed in some when it got hit. To REALLY get rid of the crease in the top of the quarter, the seam that's the gap for the trunk lid HAS to get fixed. I think it will pull the extra metal in that crease out after I get the trunk opening fixed.


Passenger side of the opening. You can see where it probably needs ~1/4 inch narrowing at the bottom.


Trunk lid profile. I think it got bent about 6" from where the gap starts. The under support has some minor buckling. Using a piece of flat bar for reference.


Here's the drivers side of the lid. Just figure I'd toss it in for posterity.


Popped the wheel off, and this is the first piece I get to.


Here's the turn signal cam after the cover and lock plate are removed. Made quick work of it. Really need to get this apart, so I can figure out wtf is up. Already gotten it far enough apart to know I'm probably yanking the column if I'm not taking it virtually all the way apart in the car. The collar for the 3 on a tree is shot, I'm wondering if I can use an automatic shifter bowl for it but definitely am not holding my breath.

On another note, I have a Sunpro tach that looks pretty close to the cluster dimensions. Any one ever cram one into a cluster like this and have it look decent?
 

Mr_Roboto

Doing the jobs nobody wants to
TCG Premium
Feb 4, 2012
25,841
30,997
Nashotah, Wisconsin (AKA not Illinois)
Parts time!


Dizzy is from Skip White on Ebay, we'll see how she does. I've heard good things about them. Other parts are Rock Auto specials except the fuel filter. The list may seem somewhat schizzo but I did it this way to save on shipping.

-Shocks for the rear
-Carb kit for the 2bbl
-1 brake line for the front
-full set radiator hoses. Don't want to blow one out when driving.
-spare carb gasket
-oil filter
-plug wires for a 75 Lemans (Converting from points)
-new air filter, seems to be ancient but looks like it would be functional
-new Vbelt to replace the old one
-2 sets Bosch Plats. They were on close out, we'll see. I have heard funny things about Bosches in non-german cars. I figured for the price I can go buy some Delcos or Autolites later if need be.

Right now what I really need are steering column parts. Still haven't figured out a good source yet.

I'll probably start tossing this stuff in a little at a time, This will get me way closer to a good running "stock" engine. That being said though the way she's running I think what she probably needs most is 10 gallons of fresh gasoline in the tank and a filter change and then the timing/dwell set. The gas cap is gone (Another thing I need to get) and she had sat for a year, so varnish city I suspect.

Other than that bidding on a Performer intake on Ebay. Since I can't seem to find an iron 4bbl intake locally for less than $100 I figured I may as well get an aluminum intake. What's really funny is based on what I've been reading this is one of the few intakes that really doesn't totally suck for a street Pontiac. It will however knee over before a stocker on something like a hotter 455, but I don't have to worry about that I suspect. The other cool thing about Pontiac intakes is if I want to play with em some you can cut the water away from the runners/plenum and play musical intakes. Then again I'm tempted to try and see what happens when I bring her up nearer redline with the 2bbl in regards to vacuum. If the engine doesn't pull vacuum on the top end there's really no use upgrading. If I don't get it and someone has an iron intake in the $50 range I'm definitely interested.
 

Mr_Roboto

Doing the jobs nobody wants to
TCG Premium
Feb 4, 2012
25,841
30,997
Nashotah, Wisconsin (AKA not Illinois)
A 4 door LeMans. There surely aren't too many of those left! I'd opt to keep those hubcaps and make it into a T-37 clone.

This car is optioned appropriately for a t37. By that I mean NOTHING. It's a legit stripper car, if it was a 2 door someone would have grabbed it for a race car by now probably.
 

Mr_Roboto

Doing the jobs nobody wants to
TCG Premium
Feb 4, 2012
25,841
30,997
Nashotah, Wisconsin (AKA not Illinois)
Did some work on the column. Down side is I fucked my shift lever up. This is a column I ebayed from a 71 Chevelle. If you notice it only has 1 "arm" on the bottom. That's because it's from an automatic.


Few pics. Notice the end is different due to the automatic not having to push down on the center tube to make things happen.


Notice the upper left column tube is torn, the right one isn't. Despite being an automatic they are the same tube. The center piece tube, the 2 actuators for the levers at the end, a spring or two and the shifter lever its self seem to be the only really different parts.

Still having some issues though, now that everything else is somewhat in one piece the problem is this; With the pin in for the shift lever, the actual end piece is too long. I tried to bend this some and it broke. Guess I'll either have to weld it or get another one, may be the right time to shorten it a bit. It seems to be about 1/16 to 3/32 too long. Looking at this lever and another on ebay, I *REALLY* suspect this is not the right lever but one from another vehicle.
 

Mr_Roboto

Doing the jobs nobody wants to
TCG Premium
Feb 4, 2012
25,841
30,997
Nashotah, Wisconsin (AKA not Illinois)
scored some Cornells for $25 each. Shame there are only 2. These are in awesome shape, and have nubbies on the side still so not much in the way of milage I suspect. Excited that they will A)hold air and B)not have decades of dry rot.


First one on the HF wheel machine. For $40 on sale it's not terrible, takes a bit of a learning curve but I'm getting there. I changed this 1.5 times in less than 30 minutes. The .5 times being that I seated one side of the bead before realizing that I had white wall out. That just won't do. I didn't seat the bead tonight, I'm going to wait until I get new valve stems to install. I don't figure these as being trustworthy. I still need to get the balancer from HF or make one (I have been thinking about trying an old hub, a U-joint and a counterweight) but I am not sure if you can easily get a variety pack of hammer on weights. I know the stick ons suck so fuck that. May just pay for balancing.


Comparison of the old tire. The 205-75R14 is pretty close to what was on there in diameter and width. I think a 225 or 235 would be practically spot on. It's within probably 3/8 inch diameter wise, so I'm not going to sweat it. Worse comes to worse I'll stick em on the fronts. You can see the slight variance of width here.


Just a pic of the goods.

Besides that I also found out some interesting things about the locks on this car. I was driving down I55 and saw a place called Larry's Locksmith Service on the frontage road in Bollingbrook and stopped in. It was cool to talk with the guys there, they knew their shit and also were willing to help with my key issue unlike a few ppl I talked to on the phone as well as give some advice.

First off, since it's pre-74 the doors and ignition are the same key. I thought I didn't have door keys due to that. The second thing is that the trunk and the glove box use the same key. That means I can get a key made for both based on the cylinder I have pulled. Lastly, had I needed the door/IGN lock you can pop the passenger side door cylinder out on these and they'll have the key ID on them. Apparently GM decided to go to a separate ignition key and door keys after people would steal the door lock cylinder, get a key made and proceed to drive off. I definitely learned something new. Figured it was worth a shameless plug. :)
 

Mr_Roboto

Doing the jobs nobody wants to
TCG Premium
Feb 4, 2012
25,841
30,997
Nashotah, Wisconsin (AKA not Illinois)
Well, the crank case is full of gas. Not sure if it's the carb or the pump. Going to go get another pump just in case. If it were the carb what should I look for? Stuck needle/bad seat? I have 2 PNs, 7041171 which is what's on the car but one from an Olds 350 that's 7042155. Trying to figure out the CFM of both and determine which one to use. Can you bastardize parts between these carb?
 

Mr_Roboto

Doing the jobs nobody wants to
TCG Premium
Feb 4, 2012
25,841
30,997
Nashotah, Wisconsin (AKA not Illinois)
OK, so a few updates.


Fuel pump was toast. I pulled it off after draining the block and gas dripped out. I guess that's why the crank case was full of gas. Debating rebuilding the carb but considering this the likely root cause. Drained the oil as well, will put in a cheapie change i got and drain it out after I bring the engine up to temp for a while.


This is another unique piece to the 3 on a tree column. I had to weld this back together, the notched one is for the automatic detent. Besides that, I need to grind on the shifter lever some due to the first gear lock hitting and not letting me put it into position. I am now sure this isn't the right lever. Gotta make it work as I can't find another one.


Mr_Roboto

Doing the jobs nobody wants to
TCG Premium
Feb 4, 2012
25,841
30,997
Nashotah, Wisconsin (AKA not Illinois)
So, fired the engine up tonight. I cut the filter, didn't find any metal. I found an absolute fuck ton of carbon however. I'm going to assume it's due to the gasoline contamination breaking everything free. Threw fresh oil in and gave her a go. Took a few cranks but she fired right up. Sort of to be expected with the new fuel pump and all.

Checked the timing, it's got 12 degree initial (as per manual) as well as the mechanical advance being functional. I didn't verify what RPM it came in at, but it's there. I also have a basic timing light not one of the fancy advance style ones. It has no vac advance right now, but that's going to be in the works. I need to fix that and a few of the vacuum lines that were kludged in by the PO. From my understanding on these engines they came from the factory with a solenoid that disables vac advance below 90F anyways for emissions.

This engine idles and revs smoothly besides the back fire. Amazingly so. It's so quiet with exception to the alternator and loosey goosey vbelt I need to replace. Supposedly these had darn decent balancing tolerances from the factory and if this specimen is typical I would believe it.

The backfiring seemed to get a bit better as I ran things a few minutes, but the tip in still backfired through the carb. That leads me to believe I should probably toss the kit I have in. I am debating between tossing in the dizzy or the carb kit first. I'm still paranoid of the cam but after seeing the pan contents and the filter (The filter would have had something more coarse than the "powder" I found in it if it wiped a cam) I feel a lot more confident moving forwards that worse case scenario would be something along the lines of a timing set replacement currently.
 

DOC-Z

Chickun maka LOUSY housspaat!
Oct 13, 2008
1,386
158
Johnsburg, IL.
Real Name
-Larry
In regards to post #23..

What a P.I.T.A.!!! It has to be a 3 on the tree...huh? ...and nothing else will work, but if you could have found something, it would have been before it went to the crusher in 1981.

Sounds like you're doing it the right way. I wouldn't rebuild the old carb just yet, as it may jar something else loose. If you have a spare, I would use that and see if it still backfires. However, it's not like you can run over to Track Auto or find a spare carb. in a buddy's garage somehow, so maybe the rebuild kit is looking like a better option.
 

Thread Info