

10sec 2V Crown Vic Build
First off it took two motors, a transmission, expensive fuel system, and an idiot to make my mind up to build my own builds.
I started planning the build for the BADDEST daily driven Crown Vic back in 2006. I was trying to decide bigger S/C or go Turbo. I started researching a found the best way to build is four basic steps.
1. Set a Goal for the car
Ok for my goal: I wanted an all round good Daily Drive and track car that could run 11.0 or 120mph ¼ miles.
2. Set a budget
Budget was set for 12k
3. Make a list of pros and cons
for options for build
4. Don’t lesion to the cookie cutter builders
With my goal set. I began to do research and understand the two options I had. The two options were Supercharger or Turbo. The S/C path would have been easier but I would be limited to a set power unless I spent extra for different tunes, pulleys, and I know from the S/C setups the maintenance is nonstop with a Daily Driver. The Turbo path I was a better pick cause to add power it was only a turn of a knob or button away. The maintenance was that of a factory car. If you wanted you could go every 5000mile for oil changes and the belt last 10x long than on a S/C setup. When doing my research I started to meet people that had slimier setup I was researching. They were more they happy to show me there cars/trucks. I took a ride I a few S/C mustangs and then in a Turbo Mustang. From that one ride the decision was made. TURBO!
To the drawing board:
HAVE:
Crown Vic 4300lbs, 4.6l 2V iron block, D.S.S P&P pi heads , Comp 270Cams, 4r70w transmission, Factory 8.8 Rear-end
NEED:
Rebuild short block, Build Transmission, Convertor, Fuel system, Rear-end, Gears, Turbo, Wastegate, BOV, water to air intercooler, intercooler pump, different cooling Fan, Engine management, Transmission controller, Gauges, wideband, and supported materials for upgrades: Hose, fittings, wire, piping, etc…
Getting started
ENGINE:
I sent the block out to get bored .020 over but had to wait until new pistons where here to get the block bored to piston spec. The new pistons are Diamond -19cc/3.572 bore. I used the DSSracing engine cradle to help support the Block. Block was bored and balanced with new pistons and h-beam rods. The oil pan I modified by cutting the bottom of the pan off and welding a 1.5” piece of steel in place. Then the oil pickup needed to be cut and adjusted for the new pan depth. I used play dough in a plastic bag to measure the space between the pickup and pan before I cut the bottom off. After getting the measurement I modified the pan. Then took measurement needed to get the pickup tube back to the right measurement. The motor mounts I modified to be solid along with the transmission mount (before removing motor and transmission the mounts were tac welded.) This keeps the fitment issues down….


Then i ordered DSSracing cnc’d heads and Comp 270 cams for the turbo build.

Left 270 comp cam, Right Crower defective cam

So the long block was ready.

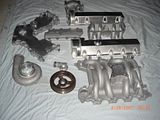
INTAKE:
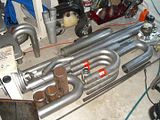
I got read of the factory intake as I know I would be pushing its limit. I ordered the 2v typhoon intake. C&L Plenum, BBK 70mm TB, I made a custom 1" spacer (fit under the plenum). Here is what the few items looked like going to the coaters.
FUEL SYSTEM:
Factory fuel tank i sumped with specs from Aeromotive fuel tank sumps but added 15% to total size of sump. Welded two -10 bungs to sump. One is spare and the other is used to feed the motor. To feed the motor i ran SS braided lines. -10 to a Meagfuel filter, Filter mounted on MegaFuel 750 pump(part#4303), from there I ran -10 along the frame over the axle to just in front of the A-arm supports(passenger side)here I add a second filter. From there i ran -10 up to a") to 2 -8's, -8 is only about 1.5' do to the flexibility of -10 to the CRL fuel rails, -8 out of the rails to the Meagfuel fuel reg, -8 to fuel cooler than -8 return to fuel tank. Oh I added a fuel cut off before the first filter.
to 2 -8's, -8 is only about 1.5' do to the flexibility of -10 to the CRL fuel rails, -8 out of the rails to the Meagfuel fuel reg, -8 to fuel cooler than -8 return to fuel tank. Oh I added a fuel cut off before the first filter.

INJECTORS:
Left are 105lbs, right 60lbs. you can see the (ID) size difference.

Here you can see the difference of the exterior sizes. Adapters are needed to get the same size length as the 60lbs.
Left 105lbs, right 60lbs

TRANSMISSION:
Transmission is a 4r70w that was built by Jake@powerbythehour, Fully auto Lentech Trans-Brake. Jake did a few upgrades to help prolong the trans and deliver power to rear-end. Torque convertor is a FTI 3500 stall lockup, Art Carr Deep Transmission pan, I ran -8 SS braided line to the largest B&M cooler with fan. trans temp at the end of track is around 185-190*.
REAR-END:
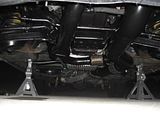
Rear is a Factory Limo 31 spline rear that I added braces to and welded the axle tubes. Rear-end supports where enforced ¼” thick steel angles to handle the launches. Control arms are Metco (ordered for marauder but is the same as our Vic’s to 2003 as far as I know. Rear-end supports where enforced ¼” thick steel angles to handle the launches.


Drive shaft is a Metco and has been on the car since 2004. Sorry no pix but i do have pics of the custom drive shaft loop.


Engine, Transmission Management, and Gauges:
Engine Management: Mega Squirt 2/Tuner Studios- with extras Fan controls, boost control, two step, Transbrake, etc…
Trans Controller: Baumannator TCS
WideBand: Innovate 3781 XD-16, Autometer RPM, Boost/Vac, Electric fuel pressure gauges mounted in a custom pod.
Gauges I keep them as hiding as much as possible with a custom pod that fits above the rearview mirror.
also a custom wiring harness for the engine and trans was built.
Okay now to the goods:
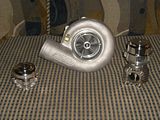
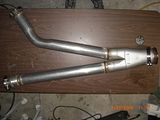
Turbo and items needed: 76mm Precision turbo with .81 a/r, LAVA turbo heat shield, Tial 46mm waste gate, Tial BOV 50mm, K&N Filter
Intercooler:
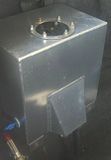
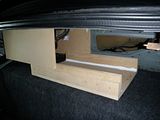
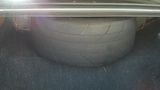
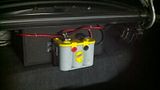
900hp air2water intercooler, Aftercooler, 1- 5gal aluminum fuel cell, 1- 20 GPM Single Outlet intercooler Pump. Intercooler tank was customized to stand upright and give access to fill with ice when needed. Custom cooper line were built the get the water from the back 5gal tank to the intercooler. The cooler pump I mount on the front bumper but that caused a few issue so i moved to the bottom of the trunk. as the pump does not like to pull. They are built to push fluid. To fill the ice tank I modified 2.5gal water jugs. on one I just needed to drill a hole in it to allow the drain for tank to fit in. the second the bottom was cut out and a fiberglass neck was built to help with filling the tank without spilling ice/water all over trunk.

Here's a list of hardware needed with a shot of the tubing/pipe i used along with mods done.
1- T4 inlet flange, 2- Weld-on 02 bungs, 1- oil (-10) drain kit, 1- oil (-4) feed kit, 2- 4” Mild Steel V-Band Assemblies, 1- 3.5 Mild Steel V-Band Assembly, 1- 3” Mild Steel V-Band Assembly, 5- 2.5” Mild Steel V-Band Assemblies, 1- 4” Weld-on flex pipe, 1-2.5” Weld-on flex pipe, 8- 3” Stainless Steel T-Bolt Clamps, 2- 4” Stainless Steel T-Bolt Clamps, 8- 1.5” Stainless Steel T-Bolt Clamps, 2 -3” Silicone hump hose, 1- 4” Silicone Hose coupler, 1-3” Silicone couplers, 1- 3” Silicone 45* Elbow, and piping.
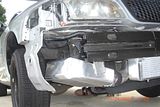
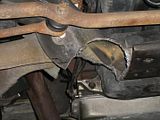
K-member needed to be modified. I cut two 4.5" half moons out of each side of the K_member. doing so i needed to be enforced to support the weight. after the enforcing i welded in 4.5" steel pipe to except the the 4"down pipe and 3" turbo feed.
So after the K-member, Radiator support, Motor mounts, Trans mount,Fuel system, etc.. was modified it was time to fab up the tubing.
Exhuast:


To top it off i installed a nice system.

All the Mods to date gave me a final goal of 10.91@124 on 93octane@ 15psi.
Here is the finished under hood pic

Best track time to date:10.91@124 with 15psi and 93 octane
As they say you’re never done modifying....
New P&P TFS heads, Edelbrock intake and Rails, Turbo cams, 6061 plenum are installed and dyno'ed now just waiting to get back to the tack.
Updates will be here soon.
Rich
First off it took two motors, a transmission, expensive fuel system, and an idiot to make my mind up to build my own builds.
I started planning the build for the BADDEST daily driven Crown Vic back in 2006. I was trying to decide bigger S/C or go Turbo. I started researching a found the best way to build is four basic steps.
1. Set a Goal for the car
Ok for my goal: I wanted an all round good Daily Drive and track car that could run 11.0 or 120mph ¼ miles.
2. Set a budget
Budget was set for 12k
3. Make a list of pros and cons
for options for build
4. Don’t lesion to the cookie cutter builders
With my goal set. I began to do research and understand the two options I had. The two options were Supercharger or Turbo. The S/C path would have been easier but I would be limited to a set power unless I spent extra for different tunes, pulleys, and I know from the S/C setups the maintenance is nonstop with a Daily Driver. The Turbo path I was a better pick cause to add power it was only a turn of a knob or button away. The maintenance was that of a factory car. If you wanted you could go every 5000mile for oil changes and the belt last 10x long than on a S/C setup. When doing my research I started to meet people that had slimier setup I was researching. They were more they happy to show me there cars/trucks. I took a ride I a few S/C mustangs and then in a Turbo Mustang. From that one ride the decision was made. TURBO!
To the drawing board:
HAVE:
Crown Vic 4300lbs, 4.6l 2V iron block, D.S.S P&P pi heads , Comp 270Cams, 4r70w transmission, Factory 8.8 Rear-end
NEED:
Rebuild short block, Build Transmission, Convertor, Fuel system, Rear-end, Gears, Turbo, Wastegate, BOV, water to air intercooler, intercooler pump, different cooling Fan, Engine management, Transmission controller, Gauges, wideband, and supported materials for upgrades: Hose, fittings, wire, piping, etc…
Getting started
ENGINE:
I sent the block out to get bored .020 over but had to wait until new pistons where here to get the block bored to piston spec. The new pistons are Diamond -19cc/3.572 bore. I used the DSSracing engine cradle to help support the Block. Block was bored and balanced with new pistons and h-beam rods. The oil pan I modified by cutting the bottom of the pan off and welding a 1.5” piece of steel in place. Then the oil pickup needed to be cut and adjusted for the new pan depth. I used play dough in a plastic bag to measure the space between the pickup and pan before I cut the bottom off. After getting the measurement I modified the pan. Then took measurement needed to get the pickup tube back to the right measurement. The motor mounts I modified to be solid along with the transmission mount (before removing motor and transmission the mounts were tac welded.) This keeps the fitment issues down….
Then i ordered DSSracing cnc’d heads and Comp 270 cams for the turbo build.
Left 270 comp cam, Right Crower defective cam
So the long block was ready.
INTAKE:
I got read of the factory intake as I know I would be pushing its limit. I ordered the 2v typhoon intake. C&L Plenum, BBK 70mm TB, I made a custom 1" spacer (fit under the plenum). Here is what the few items looked like going to the coaters.
FUEL SYSTEM:
Factory fuel tank i sumped with specs from Aeromotive fuel tank sumps but added 15% to total size of sump. Welded two -10 bungs to sump. One is spare and the other is used to feed the motor. To feed the motor i ran SS braided lines. -10 to a Meagfuel filter, Filter mounted on MegaFuel 750 pump(part#4303), from there I ran -10 along the frame over the axle to just in front of the A-arm supports(passenger side)here I add a second filter. From there i ran -10 up to a
to 2 -8's, -8 is only about 1.5' do to the flexibility of -10 to the CRL fuel rails, -8 out of the rails to the Meagfuel fuel reg, -8 to fuel cooler than -8 return to fuel tank. Oh I added a fuel cut off before the first filter.
INJECTORS:
Left are 105lbs, right 60lbs. you can see the (ID) size difference.
Here you can see the difference of the exterior sizes. Adapters are needed to get the same size length as the 60lbs.
Left 105lbs, right 60lbs
TRANSMISSION:
Transmission is a 4r70w that was built by Jake@powerbythehour, Fully auto Lentech Trans-Brake. Jake did a few upgrades to help prolong the trans and deliver power to rear-end. Torque convertor is a FTI 3500 stall lockup, Art Carr Deep Transmission pan, I ran -8 SS braided line to the largest B&M cooler with fan. trans temp at the end of track is around 185-190*.
REAR-END:
Rear is a Factory Limo 31 spline rear that I added braces to and welded the axle tubes. Rear-end supports where enforced ¼” thick steel angles to handle the launches. Control arms are Metco (ordered for marauder but is the same as our Vic’s to 2003 as far as I know. Rear-end supports where enforced ¼” thick steel angles to handle the launches.
Drive shaft is a Metco and has been on the car since 2004. Sorry no pix but i do have pics of the custom drive shaft loop.
Engine, Transmission Management, and Gauges:
Engine Management: Mega Squirt 2/Tuner Studios- with extras Fan controls, boost control, two step, Transbrake, etc…
Trans Controller: Baumannator TCS
WideBand: Innovate 3781 XD-16, Autometer RPM, Boost/Vac, Electric fuel pressure gauges mounted in a custom pod.
Gauges I keep them as hiding as much as possible with a custom pod that fits above the rearview mirror.
also a custom wiring harness for the engine and trans was built.
Okay now to the goods:
Turbo and items needed: 76mm Precision turbo with .81 a/r, LAVA turbo heat shield, Tial 46mm waste gate, Tial BOV 50mm, K&N Filter
Intercooler:
900hp air2water intercooler, Aftercooler, 1- 5gal aluminum fuel cell, 1- 20 GPM Single Outlet intercooler Pump. Intercooler tank was customized to stand upright and give access to fill with ice when needed. Custom cooper line were built the get the water from the back 5gal tank to the intercooler. The cooler pump I mount on the front bumper but that caused a few issue so i moved to the bottom of the trunk. as the pump does not like to pull. They are built to push fluid. To fill the ice tank I modified 2.5gal water jugs. on one I just needed to drill a hole in it to allow the drain for tank to fit in. the second the bottom was cut out and a fiberglass neck was built to help with filling the tank without spilling ice/water all over trunk.
Here's a list of hardware needed with a shot of the tubing/pipe i used along with mods done.
1- T4 inlet flange, 2- Weld-on 02 bungs, 1- oil (-10) drain kit, 1- oil (-4) feed kit, 2- 4” Mild Steel V-Band Assemblies, 1- 3.5 Mild Steel V-Band Assembly, 1- 3” Mild Steel V-Band Assembly, 5- 2.5” Mild Steel V-Band Assemblies, 1- 4” Weld-on flex pipe, 1-2.5” Weld-on flex pipe, 8- 3” Stainless Steel T-Bolt Clamps, 2- 4” Stainless Steel T-Bolt Clamps, 8- 1.5” Stainless Steel T-Bolt Clamps, 2 -3” Silicone hump hose, 1- 4” Silicone Hose coupler, 1-3” Silicone couplers, 1- 3” Silicone 45* Elbow, and piping.
K-member needed to be modified. I cut two 4.5" half moons out of each side of the K_member. doing so i needed to be enforced to support the weight. after the enforcing i welded in 4.5" steel pipe to except the the 4"down pipe and 3" turbo feed.
So after the K-member, Radiator support, Motor mounts, Trans mount,Fuel system, etc.. was modified it was time to fab up the tubing.
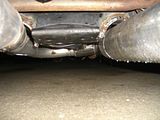
Exhuast:
To top it off i installed a nice system.
All the Mods to date gave me a final goal of 10.91@124 on 93octane@ 15psi.
Here is the finished under hood pic
Best track time to date:10.91@124 with 15psi and 93 octane
As they say you’re never done modifying....
New P&P TFS heads, Edelbrock intake and Rails, Turbo cams, 6061 plenum are installed and dyno'ed now just waiting to get back to the tack.
Updates will be here soon.
Rich


